 |
| Knut had 99 problems, but a stuffing box wasn't one of them |
Unless your name is
Pardey, or perhaps you are a
Viking longboat re-enactor, if you are a sailor, you will eventually encounter the problem facing most boats:
their hulls are full of holes.
 |
| The Platonic ideal of getting stuffed. | |
Valved holes in the hull are called thru-hulls, and the valves themselves are usually called seacocks. They can be merely barbed fittings, but usually feature some way to shut off the hole in order to keep the water out, generally seen as desirable by the crew, or to replace hoses or for reasons of servicing. Some modern boats, with air conditioning units and widely spaced heads, have many thru-hulls and seacock combinations, all of which are potential sites of failure and water ingress and some of which, in my view, are both unnecessary and poorly situated to access from the inside of the boat. Even with a perfectly sound installation of one's thru-hulls and seacocks, there is the simple law of averages: fewer seacocks means
fewer seacocks to go wrong.
There are
right ways to address this necessary, if counter-intuitive, state of affairs.
Standpipes, for instance, are centralized inlets from which the various water needs (head flushing, engine cooling, seawater for washing, etc.) are "teed-off". If something clogs the inlet, crack open the top of the standpipe, which is above the waterline, and plunge with vigour.
Packless or dripless shaft seals keep the water necessary
for cooling a turning prop shaft inside the shaft log...and outside of the boat's interior.
 |
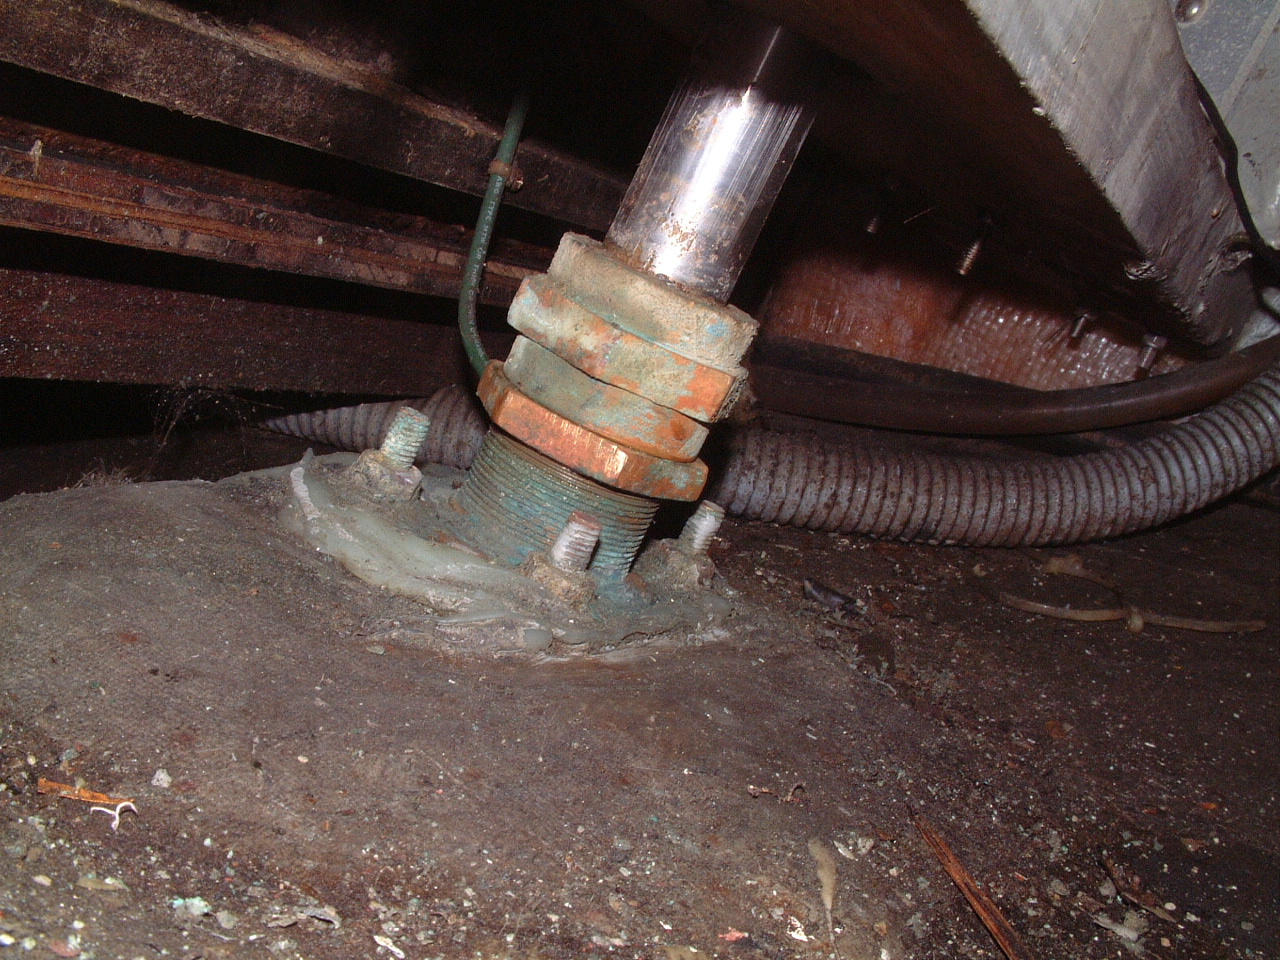
| Photo copyright S/V Sarah: You can imagine accessing this rudder post stuffing
box on a wild night offshore if you found water pouring in back here. |
Other, similar types of stuffing boxes are found in rudder posts. Thanks to the craze for aft cabins, this can be a hard place to even find, never mind effectively service. You need to swing a wrench or two.
 |
| Rain ingress from Alchemy's companionway, not (I suspect) from the dripless stuffing box |
There are no perfect solutions, and some solutions actually require some imperfection. Such is the still-ubiquitous stuffing box,
which keeps water not entirely out.
 |
| A fairly typical "conventional" stuffing box, which is designed to cool
via dripping, which is why engine compartment bilges slosh around small
amounts of oily water and look filthy. Photo (c) alberg30.org |
After launching
Valiente this year, I noticed a fair amount of water in the shallow aft bilges and in the eight-inch deep forward bilge, meant to sequester the rainwater that inevitably trickles down the keel-stepped mast. Given the amount of rain we've had of late, I didn't think much of it, but having a hard-wired, unswitched (as of yet) Whale bilge pump in the aft bilge clearly lulled me into dullness. When I heard that pump cycling on while at dock on a sunny day...and after I had already hand-pumped a couple of buckets of water out, I knew I had a water ingress issue. A quick check of all the other seacocks and thru-hulls aboard (including running a paper towel on the hoses to check for moisture from a pinhole leak) confirmed that the only water was from a trickle in the stuffing box.
 |
| Fairly representative diagram of the heart of the matter: Alchemy's former stuffing box was set up like this. |
Tightening
Valiente's stuffing box did nothing except express some grey thready goop out the front face of the stuffing box (actually a sort of hollowed out nut). Clearly, the increased use of the motor, or a sub-par installation the last time (about four years ago, on the hard) had worn out the packing.
 |
| Packing rings on a very clean stuffing box. Photo (c) Compass Marine How-to |
As it turns out, a close examination revealed both wear and the incorrect installation of the wrong-sized packing, alas, by your humble correspondent.
 |
| Convenient, if not cheap |
In order to fix this issue, which I could not in good conscience leave to haulout, should the trickle decide to go straight to flood status, I had to haul out in the slings. The closest YC with a travel lift was Island Yacht Club, who were most accomodating. Cost: $200 for about 90 minutes out of the water. Being a weekday, there was no waiting and no one wanting to launch. I had more trouble with their semi-busted POS (an apt acronym in more ways than one) card readers than I did with the job.
 |
| Our youngest crew takes the drying-out opportunity to de-weed the shaft and prop. |
I had a vague memory that the packing already present was 1/4". Packing is woven flax or synthetic, squared-off rope-like material. It is either impregnated with Teflon-like slippy goo, or one can apply slippy goo oneself. Slippy goo helps the "packed" packing to slide on the prop shaft, reducing the heat of friction, and thereby requiring less water drops for cooling.
 |
| Looks like a Scout project, doesn't it? |
Consultation with my local chandlery suggested that the proper size for my make and model of old-school, bronze stuffing box (it's not a big field, really) was 3/16", or one size down. Exercising prudence, and realizing once I was out of the water that I was committed to a full fix, I bought packing in 1/4", 3/16" and even 5/16" little coils. At six dollars each, they were a lot cheaper than the Travel Lift ride.
 |
| Not thrilled with the VC-17 performance this year. Son, however, has improved. |
After the necessary stretching, poking and picking, I freed the expired and indeed 1/4" old packing, and found that the two miserable rings were hugely compressed...no wonder they were leaking. I also found that the guy from the shop was correct: I could get
four rings of 3/16" in the same space, which allowed not only a certain flexibility in the tightening process (too tight and you get no drips and burnt packing; too loose and you get a water feature under the engine), but also the opportunity to rotate the "cuts" in the rings of packing 90 degrees to each other, making a better seal with more even wear prospects. The quarter-inch stuffing was too big for the stuffing box and consequently aged prematurely; 3/16th seems to be a better choice for my situation.
Stuffing boxes are really about finding the sweet spot between dripping and cooling.
Some experts apparently like to screw the stuffing box nut tightly, because the compressed and lubed packing needs to "settle in" or compress to its final shape. The "settling in" part is correct, but
not without adequate water flow.
The customary process is to leave the box loose enough (and yet secured
with the locking nut, of course) to have some arbitrary number of water
drops per minute coursing through the packing.
Then you run the
engine in gear. You feel or use a temperature gauge to determine that
the water flow is adequate to cool the stuffing box.
Only
then do
you tighten down the box incrementally, until the flow is low enough to
keep you happy about your bilges, but high enough so that the box never
gets warmer than you can touch.
It's tricky and it's individual
based on the water flow inside the log, the engine speed, the type of
packing and lube and even the water temperature. The goal is (usually)
about one or two drips per minute, maybe a few more under power. No
drips or "too warm to touch" is burning up your packing and even
damaging your shaft.
 |
| Nice day for lighting up the back of the engine compartment, crap day for actual sailing...no wind |
Our results, so far, are good, meaning dry with sprinkles. Below is the bilge after five days at dock. That small amount of water is not enough to have set off the bilge pump even once. In fact, it may be insufficient to properly cook a running shaft. But the portents are good, meaning I can touch the stuffing box after a motor run and it's not warmer than the surrounding areas.
 |
| Needs a scrub, yes, but no longer a bucket. |
I have no recollection why I used 1/4" packing the last time. Maybe, as it was the impregnated stuff, it slipped in easier than did the new 3/16" packing, which I anointed with a special lube. Live and learn...and check more than once a season (at launch, usually) going forward.


