Warning: plenty of pictures in this one.
 |
The redoubtable Mr. B. finds his groove.
|
When last we left the matter of the engine bay hatch, welder and fabricator and fellow National Yacht Club member Andrew Barlow had made the lid. But more was required on both our parts to finish the job.
 |
| Making the "towers", pieces of angled steel bar stock that will support the lower part of the gas struts. |
Andrew made the cross-piece, removable if needed, that supports the far end of the new hatch. My job was to trim off the excess bolt length and to apply Loc-Tite, etc. The division of labour is that he does what I can't, which is to bend and expertly weld custom fabrications. So far, so good.
 |
| There's a nicely shaped plate underneath at either end tying the lip of the hatch together. The aft par will serve a future job. |
The old plastic stand-offs and related adhesives were scraped off, and the hatch "lip" or "flange" (I tend to waver on terminology) was scraped, "Multimastered", sanded and recoated with galvanizing paint and a topcoat of cheap Tremclad. That parquet floor is leaving, by the way. It's nasty.
 |
| Just another chaotic scene in the pilothouse. |
I put Loc-Tite of the milder sort on the threads in case I need to get the engine out. Which I hope never to do. I might need to remove this to get new water tanks in, however.
 |
| That piece fit perfectly first time in. I was impressed. |
I Dremelled off the SS bolts close to flush as they will be below EPDM rubber stripping to keep the new hatch from damage and dissimilar metal issues.
My job involved some tricksy measurements avoiding both the structural members of both lid and pilothouse sole in order to find the appropriate places for mounting holes for the McMaster-Carr-acquired stainless steel piano hinge attaching hatch to boat. I needed to acquire a metal countersink so the bolt heads wouldn't dent the lid when closed. Lee Valley had a nice one.
Cleanup of the piece involved a light grinding to remove burrs. Yes, a wire wheel would have been better, but it's stainless and it's buried!
 |
| The labelling is because I am a touch OCD. An arrow would have sufficed. |
The hinge finished, it was time to attach lid to boat.
 |
| Stainless steel piano hinge, courtesy of McMaster-Carr. |
Further tricksy measurements to get both sets of mounting holes away from each other AND lined up so I could blindly get nuts and washers on followed. My Makita torquey drill was of great help. That steel is 3/16" thick, I believe.
 |
| The tarp is to keep paint off the motor, metal shavings out of the bilges and to catch stray dropped things. |
Mission partially accomplished! The lid, with the temporarily restored plastic stand-off, closes properly. Now I needed to wait for Andrew and his portable welder to be free for the last part of his work. So I put a hole in the hull, or rather, revealed an existing hole to the outside world.
 |
| I have no idea how this surround worked. That once-clear disc is a thick piece of some sort of acrylic. |
When we got
Alchemy, there was an antique (late '80s) "Video Depth Sounder" at the helm, literally a small monochrome monitor thingie that showed a rather primitive outline of the bottom and a (presumably correct) depth in little yellow numerals. It didn't seem in great shape, was huge and gobbled amps, so I got rid of it. The transducer to which it was attached, however, remained in place.
 |
| That's a milled aluminum "bullet" on the lower part, and epoxied wood on top, angled to the hull. |
This is the transducer housing, a bit draggy despite the pointy bit, I would think.
Prepatory to getting a new, current sounder, more of which I'll discuss later, I had to get the old one off. Full on grinding commenced, and I discovered half of the housing was fairly substantial aluminum. Not sure about that on the steel hull, with a brass transducer in the middle, but at least the part above was "something else", epoxy-soaked slivers of plywood shimmed in to make the protrusion straight up and down. I will prefer to do this all on the inside, I think, with an HDPE block and compression fittings.
 |
| This was immediately cleaned up and repainted. The wires will be better secured, too, after the tanks are put in. |
Luckily, the hole was a standard one-inch one, which should fit the new transducer. Tricky bit will be mounting it vertically so that it reads perpendicular to the centerline of the boat.
 |
| I can take rough numbers from this for the block necessary on the inside to orient the new sounder properly. |
Old sounder retained for reference, I cleaned up the hull plating around the hull.
 |
| It was odd seeing daylight through the bottom of the boat. Unnerving, actually. |
This area now has four coats of galvanizing paint over it.
 |
| On the threshold of further refitting. Note our old friend butyl tape. |
The next fabrication job is a new companionway hatch, which is more elaborate than a simple engine bay hatch in that it will have a hinged flap, gasketing, the ability to lock, to keep
all weather out and to keep the boat more secure than a simple dropboard. So in preparation for this, I disassembled the existing hatch framing.
 |
| I bet I could have gotten the engine in and out of that without removing the roof! But I didn't know that then. |
The "hatch hole" minus the surrounding wood is noticeably larger; the new hatch will take up some of this extra space, but should give us about another half inch of height and an inch of width. Which will be nice. After Andrew came by to run a stainless fabrication by me as a test piece for the new framing, he got to work on the "towers", the upside-down T-shaped pieces of steel to which the bottom of the gas struts would be bolted.
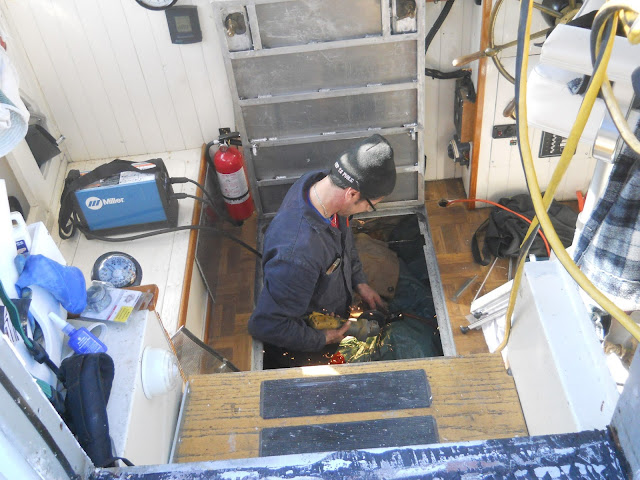 |
| It's not often I tell a man he's got a nice unit, but that little Miller portable stick welder is the bomb. |
Andrew's compact if pricy (over two grand) welding unit ran on my single 15 amp line from a nearby standpost. I improvised a
fire blanket because the stainless steel welding sticks he was using would have merely melted right through the green plastic tarp, or possibly the top of the remaining starter battery, so caution was observed.
 |
| The 'fire blanket" was a dampened canvas sack. Only slightly charred by the end. |
About 15 minutes of zapping and eye-averting later, the "towers" were firmly in place and Andrew scribed two spots where I was to drill holes. Because I was doing the rest of this. Andrew does good work, and I would prefer he stick to brainstorming followed by fabrication.
 |
| ZZZAP! |
Makes me want to weld more things, though!
 |
| The secret weapon: the heavy Makita drill with the Milescraft Orbiter, a sort of gadget to drill in tight spots. |
Today was my turn. I pilotholed and drilled the bottom brackets (1/4" steel" and drilled and tapped threads into the hatch's aluminum lugs. These would take the top end of the gas struts I had got from (again) McMaster-Carr.
 |
| Again, I'm glad I have a lot of hand tools nearby |
The gas struts themselves are powerful and long. I didn't want this hatch bonking me in a seaway. The trouble was that they needed to be compressed slightly, once bolted under the hatch bay's flange, to get onto the mounting bolts on the aluminum lugs. Eventually, I got one on myself using a massive set of channel locks, but it was easier to ask Andrew to come up so I could compress the second strut from above until he could push it on. Once on, they are unlikely to move.
The above clip is the result. Neat, isn't it? And that fit is beautiful. Eventually, this will be soundproofed, covered in faux teak and holly non-skid, as will the rest of the boat. Parquet belongs on dancefloors, not in pilothouses.
 |
| There's further "L-shaped" squishy gasketing that should greatly reduce the motor noise, not that I find it too much, to be fitted. These black strips are just the first layer. |
This hatch project (and the coming companionway project and sounder installation) have been a long time coming. I feel good about the work and the focus of the man I hired for the fabrications. I haven't been able to say that for some time.
 |
| Even the cat approves. |
.jpg/1280px-Ring_buoy_on_ship_Polynesia_(288580676).jpg)


