Warning: This post is both multi-topical and heavy with photos.
Well, I haven't posted for a month, which is historically unusual. This was due to a series of events both fortunate and unfortunate. We went in mid-August twice for a few days away, which in this case involved visiting both friends in Frenchman's Bay and a trip across the lake to visit for the first time the scenic, if tourist-ridden town, of Niagara-on-the-Lake.
Frenchman's Bay was fun, if blustery. As seen above, we aren't usually subject to heel at dock, and a fender sacrificed itself on behalf of our paintjob. Crewman Lucas experienced warm if near-oceanic waves, and the lake ate his foolishly-taken-swimming sunglasses.
 |
| The next one ate his shades. |
The trip back was fine, if (typical of Lake Ontario) the motor was needed were we to get back in time for dinner. I noticed I had passed the 25 hour engine run time mark, and realized I was supposed to change the transmission fluid for the first time. This wasn't recorded photographically, as it was mucky and I needed a third arm. About a litre of ATF (which looked brand-new) missed the bucket and ended up in the aft bilge. This will become important information later.
 |
| To the east of Toronto is a long artificial "spit" that's become quite a nature refuge. Also, it means a long diversion to the SW to get back into the harbour. |
The high water May-end of July has receded from the club, but that hasn't discourged some unusual visitors. As I am frequently on the boat at odd times, like "middle of the weekdays" depending on my workflow, I see quite a bit of local wildlife not present at busier times. I think this fellow was a witness to
the day I put in the new anchor.
 |
| Egrets, I've had a few. |
A recent mid-week job was the addition of a keyed lock to the companionway door. Yes, I can see the slight gap between frame and lid. It's an easy fix that will happen over the winter. The point is that this door is now somewhat harder to break through.
 |
| I mean, a crowbar and a chain clipper will still do the job, but this is meant to discourage, not prevent. |
Another trip on the weekend of the recently solar eclipse (70% partial over Lake Ontario) brought us to Niagara-on-the-Lake. We were told we were very lucky in our timing to get a spot on their wall as they were still in "recovery mode" from extensive flooding that had delayed their launch until late July. Their boatyard was still pretty full, suggesting that some people had just given up on the year, which was sad.
Evidence of damage was all over the place, as was evidence of circa four-knot current in the Niagara River. I made good use of our new sounder, and better use of the throttle. I wish I had been clearer on the "don't enter the docks area" warning, however, as it was a very tight turn or three to get out after I learned I was meant to go on the wall (bow to current). But we docked easily and had a good time in town and at the beach.
 |
| I'm just guessing here that the bottom drops off like a cliff right behind him. Just to the left are about three sailboats that were rafted up on an anchor, evidence of a big counter-current as they were pointed to the north shore. |
The Monday of the eclipse was nearly calm and dead useless for sailing, but quite good for sextant work. The general effect of a partial eclipse (I've been under a few) is like high cirrus cloud: a generalized dimming, but there's no evidence of the moon's "bite" if you glance at it. That takes binoculars!
 |
| It begins! |
 |
| What I choose to call "total partiality". |
Lucas, after most reluctantly taking the wheel, because we have yet to install an autopilot and he is even less keen on helming than Mrs.
Alchemy, took a break from that "torture" to wield his mother's sextant and check out the progress of the moon.
 |
| Sure, welder's glass is cheaper, but not nearly as seamanlike. |
Now, during the voyage, the galley drains were acting up a bit and, well, not draining. We weren't sailing and therefore couldn't heel, and I wasn't sure if there was debris in there. In addition, there was a stuck inline valve of this type under the sink as well that wouldn't close. We got back and figuring it out went on the list of "things to check out and/or repair."
 |
| Like this and, upon reflection, not great for below-the-waterline use. |
The next day, my club's Commodore, Don Weston, and myself went to check out the "Blue Barge" for a failure to start. Well, we got it going, all right, but discovered it either has a cracked block or a failed gasket between the manifold and the block. The first one is a lot worse than the second, which I could fix.
 |
| This old motor both propels the Blue Barge, which is used to shift the railcar wheel mooring bases in the mooring field, and, via a power take-off, pumps the hydraulics that work the crane (top of photo). It's a beast, but a useful one. |
 |
| Hey, foreshadowing! No, seriously, this was bad. It's either an annoying fix or a "do we buy a diesel" fix. |
I then had a nice lunch and debated going back to the boat for its 50 hour oil change. When I stepped aboard and opened the engine bay hatch. I was pretty shocked to see it largely filled with water. I was equally shocked to see about a foot of water in the salon.
Alchemy was sinking.
You'll have to excuse my lack of interest in recording photographically either the depth of the water or my robotic response to the crisis. The bilge pump was off, because I had spilled some ATF during the process of changing that fluid and didn't want to pollute my club's basin until I could swab it up by hand.
Well, I got over that instantly. The Rule 3700 worked (it was powered off a subpanel still above water I installed earlier in the year) and, despite being about a metre down gamely pump water up the new hose I had installed recently (I don't post
every improvement I made, actually) threw it off the boat. I ran to the club office to get an AC powered "crash pump", a residential-grade sump pump and a length of hose we use for boats that have single, non-SS hose clamps in the head. It took about 20 minutes to get the water out of the engine bay sufficiently to reveal the problem: the galley drain through-hull pipe was weeping vigorously.
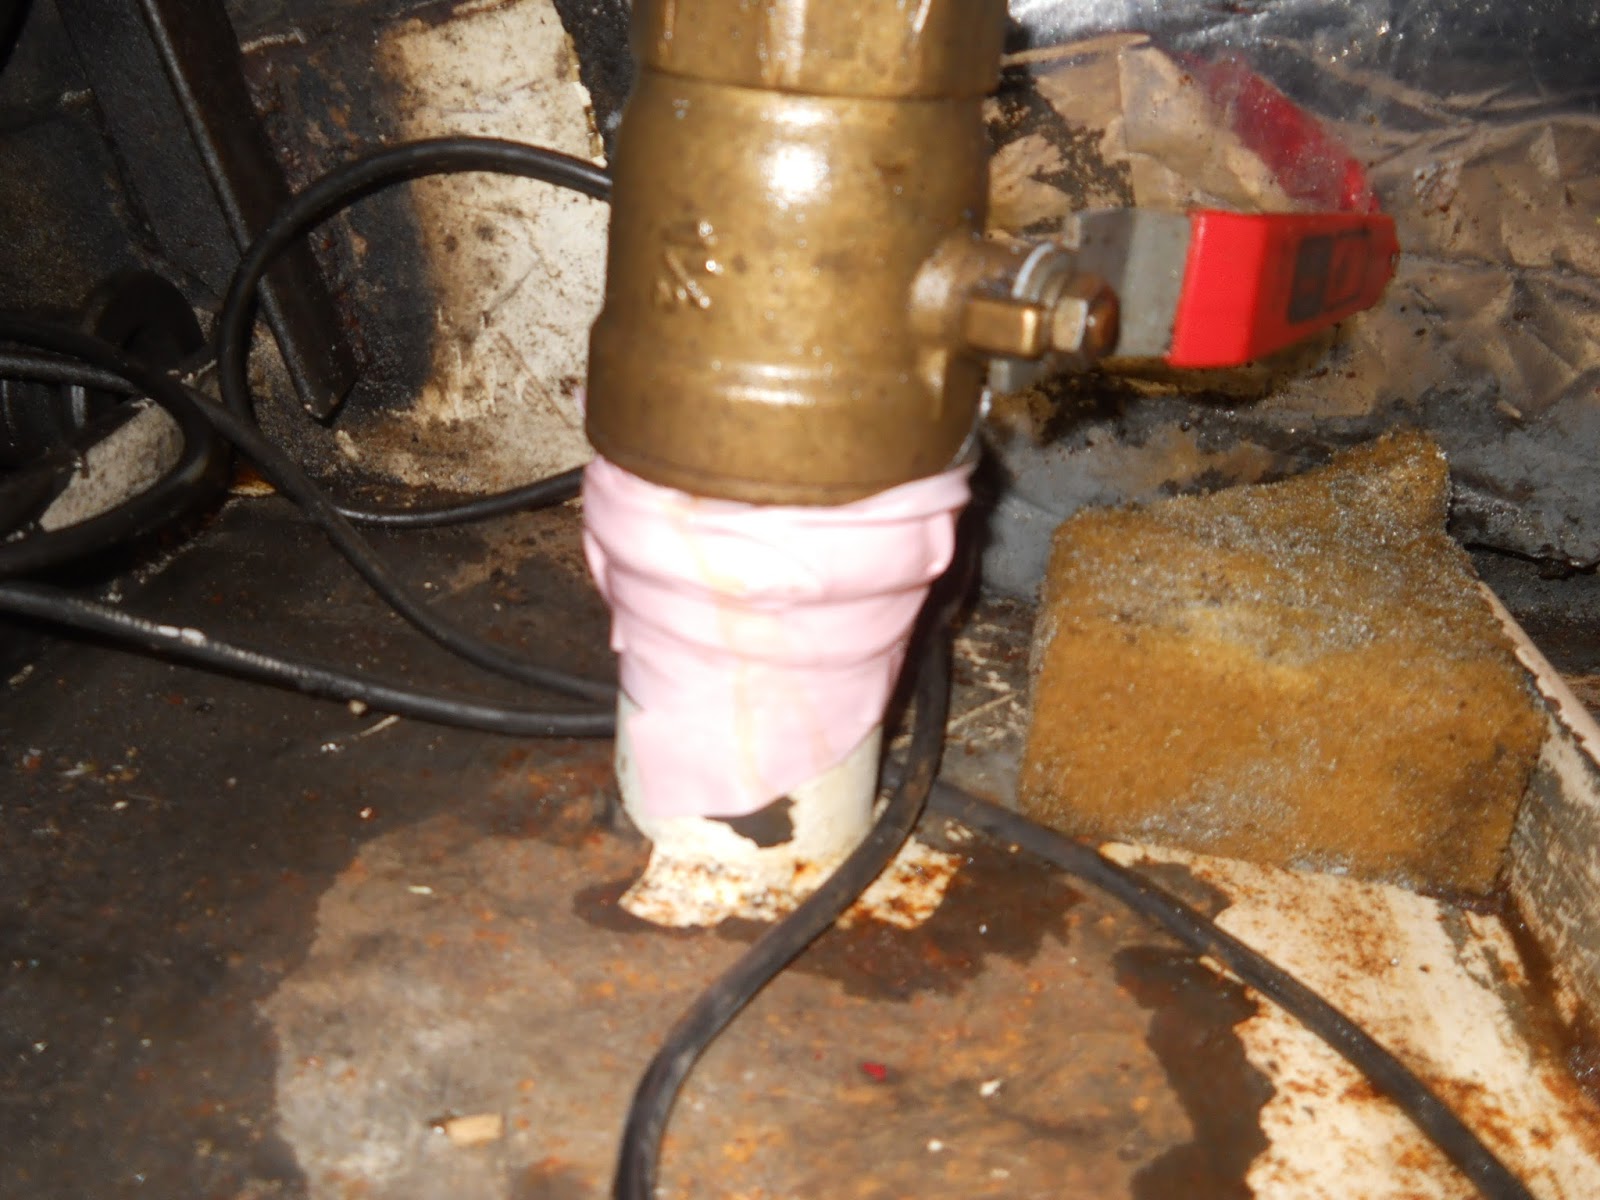
 |
| As the "crack" was below the seacock, turning it off was of limited use. Self-amalgamating tape was. |
I was able to get down onto the slick stringers and hull and stop the leak with
plumber's helper tape, or at least reduce it to a drip. Only then could I survey the damage. That's what's kept us busy since the 21st of August, frankly.
 |
| Another shot of Groundwater Zero. Yeah, that's all getting repainted shortly. |
Firstly was discerning the cause or causes of the nearly fatal leak. The short answer is I can't tell untill we haul out. I arranged to have that done at Toronto Island Marina and to have a new section of pipe welded on at least this side via Andrew Barton, my fabricator and a fellow member at NYC. But that would have involved a tow as the engine suffered damage and the diesel supply was perhaps compromised. Andrew agreed to do the work (he has a day job on the Island and it would have been convenient for him) but suggested that if the tape was working and haulout was seven (now five) weeks away, I could bung a plug into the thru-hull opening and that and the tape should flood proof the boat until haulout and doing a series of weld jobs with
Alchemy cradled.
Secondly, because I cannot at this point remove the seacock, I can't confirm what I suspect is the problem: that the pipe threads supporting the seacock seen above have fractured or otherwise cracked. I am not sure if the mechanical forces of attempting to turn the inline valve imparted a shearing force on the pipe stub; or, after 29 years, there was corrosion and it was just "its time"; or (my initial thought) there might have been galvanic corrosion as the boat next to me had had a jury-rigged garden-grade extension cord going to his race boat that I've found more than once in the water on my port side where this outlet is. I have yet to mount flat zincs directly on the hull and all the anodes are on the prop or the rudder. Clearly, that's moving up the list now.
Frankly, I can't point fingers. It could be a combination. I might not even know when we fix it (and its possibly suspect starboard side drain for the head) after haulout. But I'm paranoid now (and the bilge pump is permanently on "auto", the carp be damned, although most of the goo is out of the bilges now), and I'm down there most days. There's no new ingress of water. In fact, once the mopping up was done, the boat's really dry. Still, I bought one of these for myself and it and 25 feet of hose are at the ready should something of the same nature present itself to me again:
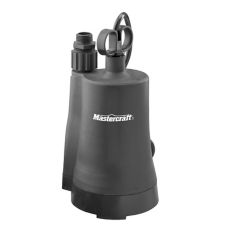 |
| It's merely supplemental. The Rule 3700 can throw three times the amoutn overboard, but it will give me time to think and I can run it off the inverter if I must. |
The Commodore is also keen on not seeing members' boats sink: apparently, the paperwork is horrendous, so as he had a few dive jobs scheduled, I offered to crew and he graciously offered to bung the offending pipe. The hope is that "bung plus tape plus vigilance" will keep us afloat until more permanent and presumably stronger steps can be taken.
 |
| Note the ramp and the diving ladder. The Commodore picked these attributes and they are damned handy. |
The club's able workboat,
Storm King, was lashed aside in the late morning (best light for this job). I gave directions as to which hole to bung. I had purchased a special foam bung as seen on the right. Id clipped the end as I knew the interior diameter was 1.5 inches, but Don reported that too much of it would protrude to guarantee it would stay put. So that was put aside and a more traditional "tapered softwood bung" (on the left) was given to him. This was smacked into place and, I hope, will do the trick.
 |
| A tale of two bungs. Really, I think the one on the right is better pushing into a hole from the inside than the other way around. |
 |
| Diving for bungs is less romantic than diving for pearls, and there's no use wearing nice shoes on a greasy boat. |
The list of what was damaged is sort of good news, bad news: The new depthsounder is fine, but the starter motor was fried and gave only the "click/hum of death" when keyed. More on that below. Mercifully, the battery boxes worked as designed and the house bank was untouched by water. The interior carpet was wrecked (except for the head sole, which never got wet) and is gone. And the Nova Kool refrigeration compressor, a Danfoss BF35 unit, got wet and is non-functional. But really, these problems are dozens of hours and hundreds of dollars, not "fetch the salvage barge". It could have been much worse. Like "hurricane hole" worse.
 |
| What worse looks like. |
As I had mentioned, I was on a mission when I discovered the flooding to change the oil as I had surpassed by six hours the recommended initial change interval of 50 hours. Well, I expected to find a 'grey milkshake' of watery oil and perhaps a need to do several kerosene flushes, as I had been done this road, sadly, before with a duff waterlift with the old Westerbeke W-52 engine pre-2011. But it appears that my new diesel's gaskets are still tight, because the "used" 50 hour crankcase oill was the colour of night, as it should have been. There was zero evidence of water. Same for the transmission fluid. In these respects, we got very lucky.
 |
| Healthy and black. The next oil change isn't until 350 hours on the clock. That's probably going to be in Halifax. |
Back to the starter. The corrosion seen here was also evident on the starter battery and its associated cabling and fuses, some of which I can likely salvage. The battery was fully submerged, yet when I took it off the boat yesterday (we are going for a full paint job down there before water tanks go in), it still read 12.75 VDC. It's old (about six years) and I'm going to scrap it anyway in favour of a different setup; more on that later, but it's still impressive to me that it didn't completely discharge.
 | | | | |
| Yeah, not great. The good news was that I cut back that cable and the interior was perfect, suggesting that my power lug crimping and heatshrinking technique is pretty waterproof. | |
|
Back at the block, I took the starter off and figured out my next steps. As I found with July's
farcical filter fiasco, it pays to do one's research. I learned a great deal about this starter: it's a
common 12 VDC, 2KW nine-toothed CW starter used in a variety of Beta Marine diesels, namely the 43, 50 and 60 HP models. Meaning also that it's used in a variety of Kubota backhoes, diggers and tractors.
Now, I checked out the
prices for this item from the English Beta Marine site. It goes for £164.95, or about $270 Canadian. Ouch. Still, she doesn't spin without it,
which is a case for decompression levers, I suppose.
 |
| As above, so blown: That wire and plug is a 40 amp circuit going to the wiring harness and then to the key on the panel |
So my first and somewhat cynical stop was the nearest Beta Marine parts dealer,
Craig Morley, who advised me that as he would just have to order the thing from the main Beta parts dealer in Canada, out in British Columbia, I would do better to source it locally via a Kubota dealer. Thanks, Craig. You could have just sold me one and cost me a lot of money. You just went to first place in my "surveyor" list.
Just to cover my bases, however, I phoned B.C. and got a price for this Beta starter, which is actually a Kubota starter, which is actually a Denso starter. I was quoted a price of $1,700 Canadian. Plus shipping and this is a fairly chunky item. Yikes.
 |
| Before opening this up, I realized someone had been a touch lazy with the "Betatastic" paint job. |
I called a Kubota dealer out by the airport. I was quoted $701 Canadian. Well, a grand better. Let's keep it up. Meanwhile, I poured out the water and dried off the guts. Craig had suggested the sooner I did that, the more likely I would be able to have it repaired.
 |
| The coils and brushes inside were cruddy, but the rest was easily cleaned. |
So I did two things: 1) I ordered
a new starter, minus the key circuit, which is a small mod, from the States. Cost to me? $264.32 U.S., including shipping. It arrives tomorrow. It will be, once modified, the spare starter and will be bagged and tagged to avoid this in the future. I was going to do that anyway...2) I took the drowned starter to a reputable local starter rebuilder place.
 |
| Unusually for my life, this was downtown and not in south Etobicoke or Mississauga. Most convenient! |
They turned it around over the weekend, although with a new look; evidently, they paint everything they rebuild. Cost to me? $160 Canadian. Well, well.
 |
| NICE! |
 |
| Being careful, I tried to tighten all the bolts. They were all tight. I am well-pleased. |
About 20 minutes of reinstallation later, the engine started. Yay! Of course, because I don't yet know whether there's water in the keel tanks, I stopped the engine right away. But we're back, baby!
As a side task, and because I was swabbing out the forepeak workshop which took on some water via a limber hole I will keep plugged on passage, I emptied much of the forepeak, dried it out, and removed two surplus anchors and about 250 kilos of "
trim ballast" in the form of lead shot in thick, taped-up plastic bags. This was orignally in place to keep the bow on its proper lines with a) different engine and b) two 100 gallon water tanks aft of the mast and c) a couple of Trojan T-105s as the house bank. Now there's a new 30 kilo anchor out in front, six L-16s under the mast, loads more tools and stores and the tanks, when they go in, will be smaller (probably about 400 litres over two tanks) plus the weight of a watermaker system. The effect was noticeable. And now my garage has a lot of scrap metal potential.
 |
| Having that bobstay/snubber plate proud of the water hasn't happened for some time. I like it. |
Now, there is still a lot of trim ballast left in the form of several 50 kilo lead ingots on either side of the collision bulkhead. Plenty to move around as and if needed, but as I move gear/spares forward and stores lower, they may need further shifting.
The last significant damage was the fridge compressor. I have it disconnected at the moment as I have to replace some wires before I can determine if it just shorted (and I can find the fuse on the PDF I found of its wiring) or is shot.
 |
| You can see where the water went: that rusty four-screw terminal is the DC power hookup. |
The "muffin fan" is easily replaced, but I have to do yoga to get two hands in here to finish the job. Fingers crossed, because it's a pretty effective unit and if we ran it at more than 2 out of 7, stuff in the fridge section would freeze, even on hot days. Also, they aren't cheap. So we'll see. I think I will reroute the DC supply
above the base up that back wall (which is actually part of the bench seating over lockers) and put in an inline fuse suited to the 10 ga. that's supplying the compressor.
 |
| Worth saving, I hope. |
Thanks for reading this tale of woe mitigated by less woe. This was bad, but not voyage-endangering.