 |
| Ye olde main switch. |
Warning: Loads of photos in this one.
I have maintained for some time that the reason I have taken so long to do jobs on Alchemy is that I have felt it critical for the safety and well-being of myself and my family that I understand all the mechanical, electrical and hydraulic devices aboard that I have installed, or have yet to install. Given my utter absence of any sort of practical instruction in such matters, and the fact I never took even rudimentary "shop" class in high school, and that I don't own a car nor did I grow up with greasy hands from repairing them in my parents' driveway, it's been a bit of a slog.
Sometimes, delay is indeed about ignorance or inexperience. Now, I've had plenty of help from friends, professionals and friends who do their boat work at a professional level. I have also not hesitate to contract out work (generally to my own designs and measurements) that I am too inexperienced to do, even if I had the right equipment. The Aquadrive thrust yoke and the engine stringers fall under this category. Other times, however, hold-ups can be about a missing part or parts one needs to do the job correctly. Not that I didn't have a lot of parts at hand to revamp the diesel's 12 volt system:
 |
Just some of the bounty from the closing of the Dock Shoppe, now reopened as "The Dock Shoppe".
|
Note the completed 2 gauge tinned wire lengths below, made up as per
the reliable refit guru Maine Sail's methods. While I had been assured by local authorities that 2 ga. would be robust enough to run current from battery to diesel starter, I knew that what I
really wanted to do was to have heavier gauge wire, which not only can carry greater current and suffers less "
voltage drop" but arguably takes longer to decay. So Peter from
Holland Marine had an appropriate length at a sale price. Off to Mississauga via bike, and yes, 45 feet of 2/0 gauge is heavy.
 |
| This rather nice examples of my crack at "Maine Sail"-quality crimping and heat shrinking technique will be repurposed with the house battery bank. This stuff is too pricy to waste. |
Meanwhile, while I had already ordered a selection of 2/0 ga. "
Power Lugs" for crimping purposes, I was finding, somewhat to my dismay, that I needed a variety I didn't have. I must have killed a day phoning around trying to trace these items. In the end, I reordered bags of FTZ lugs in 1/2 inch, 3/8 inch and 5/16th from
Bargainboatparts.com, who had actually spotted an ordering error in my prior order and sent me a free bag of the right item) and from Binnacle.com, who had the otherwise extinct 2/0 ga. 1/4" hole crimpable lug, made by Ancor. These items arrived in what I can only describle as a dilatory manner, and the NYC office folk asked me not to send stuff to them anyone as I was a pest, and probably mad and bitey-looking as summer dribbled away and I was a few lugs short of a connection.
 |
| Blank, long or short-barreled, angled three different ways...who knew? Now, I know. |
Naturally, as is the way of boat refitting when one is constantly salving ignorance with time and money and occasionally burns and cuts, I found out that items such as
Power Lugs can come without holes at all. Yep, I could order a selection of
blank lugs and simply drill them as tight as I wish, depending on the bolt or stud to which I wished to dog them. At a recent party, I met an old pal named Pat, whom I hadn't seen for literally decades, is some sort of supervisory electrical contractor fellow and he has bags of these things he can acquire for me, and I don't even know his union handshake. Needless to say, I will be stocking up on spares from Pat.
 |
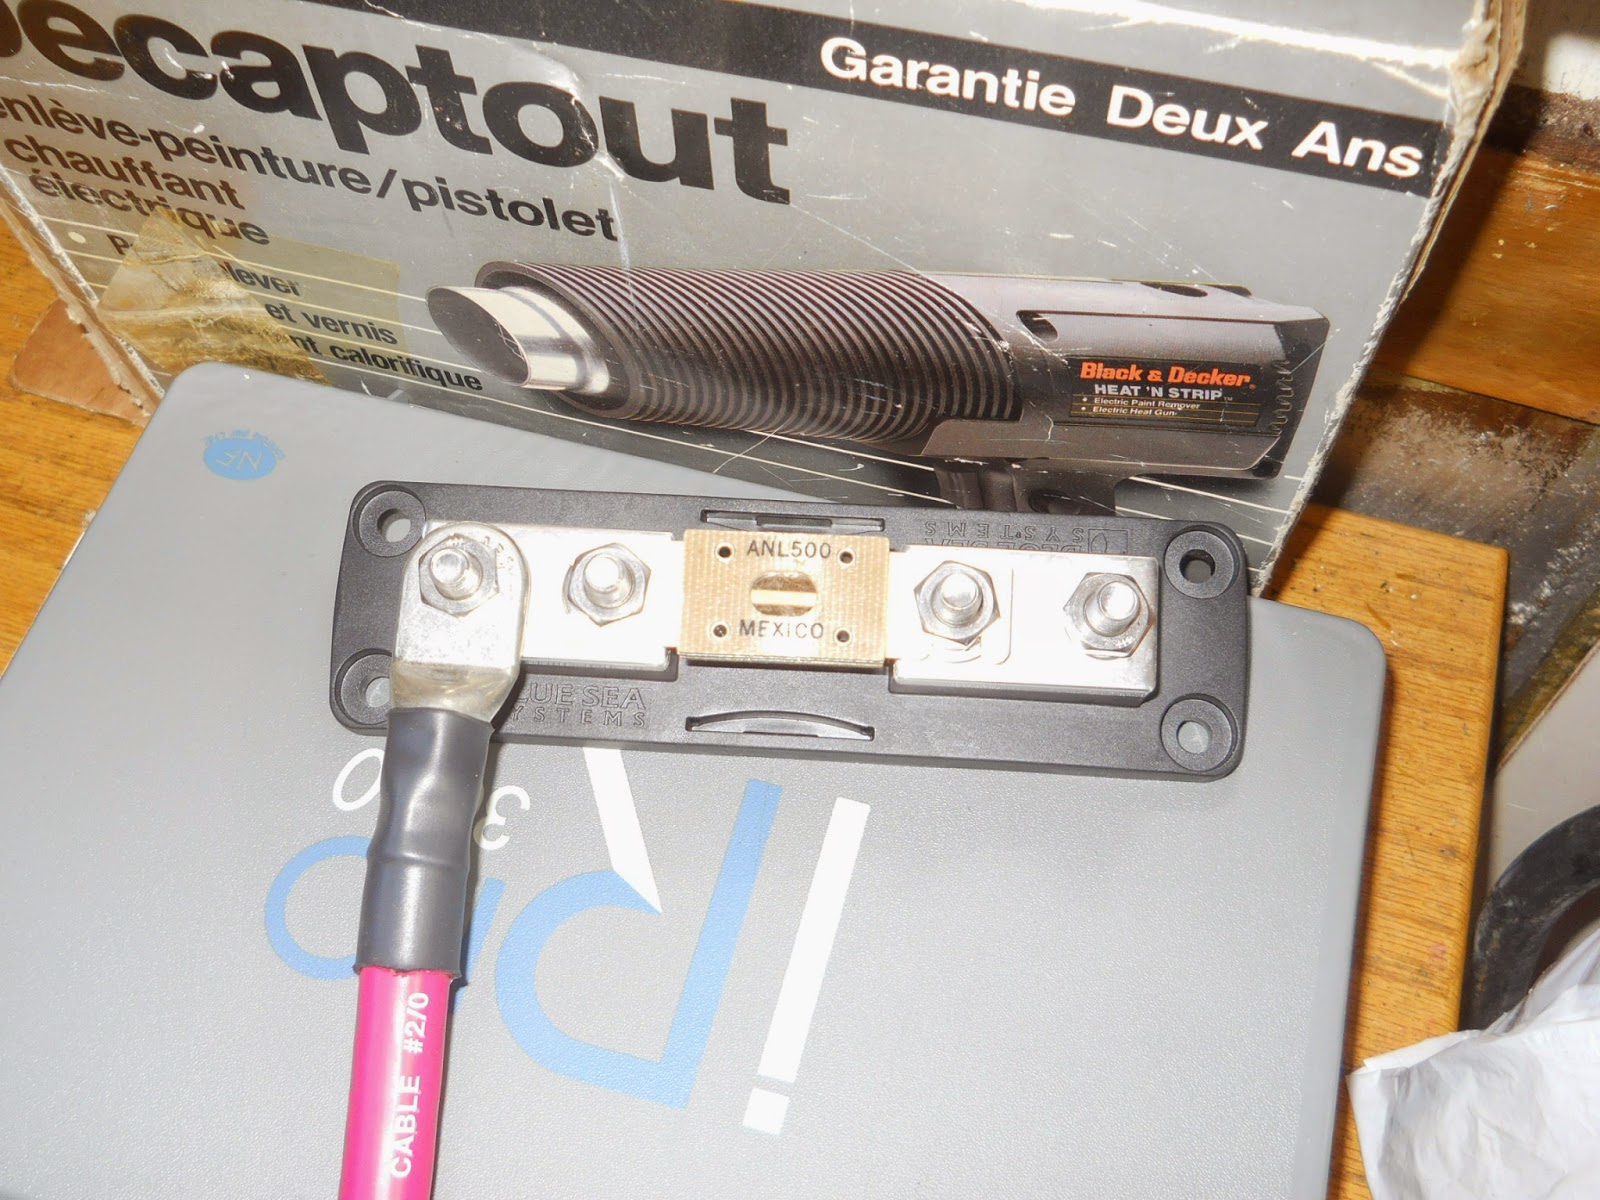
I estimate the "kick" of the current draw of the starter to be about 170 amps. So a 250 amp fuse would've worked
|
Meanwhile, there were other elements to consider, even though this set-up is strictly "rubbishy little battery to switch to diesel" By upsizing the gauge of the wires, I was increasing the potential load they could safely carry. This means recalculating the amp limit of the fuse involved.
 |
| Ah, that's more like it. |
Because I wish (in the future) to have "switched flexibility" with my starting options, I had to calculate for starting the engine from my as-yet unbought house bank. Basically, I want to be able to pump amps at specificed voltages into said bank, which, when topped up, will "spill" via
relay/echo charger current into a starting battery, which, when full, will not overcharge. But I also wish to have the option, should I experience a failure in the starter battery or circuit, to start the engine from the house bank, or vice-versa. This is actually just the start of a system I hope is robust enough to do the job, but flexible enough via switching to stand unanticipated outages. Because in cruising, unanticipated outages are best anticipated.
 |
| New, beefier main switch means bigger studs, meaning bigger ring terminals...oy. |
So the old main switch got "back-benched" to a future role featuring less amperage, and the
new Blue Sea switch (which is matched to wire and fuse) went in. The only problem was that the 12 ga. conductors that fit on the old switch's 3/8 inch post...crudely....needed 1/2 in. ring terminals.
 |
| About five bucks per light, and I should get two or three years per doorbell battery, maybe more for infrequently accessed stowage spaces. |
Off to Mississauga I went on my bike to
A1 Parts. It's quite a bit what Active Surplus used to be like: chaotic, but they somehow know where slightly obscure ring terminals would be. I got some dandy wee LEDs and assorted holders for my future "open a locker hatch, light goes on" project.
 |
| The labeller has been getting a workout, and so have all the big and little fancy crimpers I've acquired. |
But I digress, even though my legs were getting a decent workout cycling out to Mississauga. That's where all the obscurities are. Now, one of the slightly odd things about my Beta Marine 60 is that it comes in, as with all Betas, evidently, a multiplicity of variants: There are gensets, there are keel-cooled British canal boat diesels, there are several gear box options both mechanical and hydraulic. Betas are known as a basic, decent diesel (made by Kubota) that has been customized for the typical "motor cave" in modern sailboats, which, quite typically, lies under the companionway stairs, which tend to hinge upward. Revealed, the Beta will have the "consumables", the belts, filters, and engine controls, within easy reach, at the front of the engine. That's their charm. I did not require charm, and I got an engine with (for instance) a fuel filter that did not have a priming button, but rather a little device with a tiny priming lever. The diagrams that came with my Beta (and the various manuals I've been able to download) do not precisely match my engine's layout. The fuel intake and return is well aft. There's a mysterious hose. I had to work by feel and extrapolate. You'd think I'd be getting used to this by now.
 |
| The positive post on the starter: this was a process of elimination, really, as it doesn't match the blueprint so well. |
A mirror and a strong light came in handy. Of course, positive and negative posts are differently sized (3/8" and 5/16", or their metric equivalents, of which there is quite a lot on the Beta) and so there were a couple of crimping errors involving 1/16" of an inch.
Why worry? Because a tight fit to the post or bolt in question gives maximum conductive surface area, tends to exclude moisture a little better, and is less likely to vibrate freely. It's a steel boat. I wouldn't want these cables in a condition of "full of amps" flopping about.
 |
| Before: As shipped, all that red wire suggests this is the needful place. |
I've certainly used mirrors and camera to good effect in these tasks. Despite my compartively fantastic engine access, I can't see some spots easily without excessive, unappealing grunting.
 |
| After: there's a small "blade" type fuse in there that's 40 amps. Guess what I can't find above 30 amps? |
This is the finished positive post on the starter. Behind the lug are wires leading to the loom (the bundle of connections going to the readout panel at the helm) and to the alternator.
 |
| Slightly out of focus are the various cutting and crimping tools I have been using for some time now. I have yet to regret buying decent tools. |
This is the negative, or ground, conductor, along a beefy 2/0 gauge. It goes from a perfectly nondescript and unmarked bolt on the block adjacent to the starter, straight back to the negative post on the battery. Both positive and negative conductors are long enough (about 1.7 metres) to reach anywhere in the engine bay I am likely to tie down the permanent start battery.
 |
| It only looks half-assed. It's merely temporary to ge tme moving before haulout. |
Leads connected, meter in hand, I checked all my voltages. This smallish 12 VDC is only required to stay charged, to start the diesel (fairly obvious, that one), and to power the single bilge pump I currently have installed, despite the fact that water only gets down there to date if I fail to close the pilothouse roof hatch when it starts raining.
 |
| The terminal block with the Fuse of the Gods. And the cover of the Fuse of the Gods. |
According to ABYC standards, which I generally find sensible, the fuse from the positive battery terminal should be no more than seven inches from said terminal. This is six inches. So it hangs in the air...those 2/0 ga. wires easily support it. Again, this will be done to code later when I integrate a house bank with the engine circuits.
 |
| And this was with no fuel supply. |
Eventually, after various measurements and a very technical spot of thumb-sucking, I declared the power aspects done and actually started the engine. It obliged on what I would term "the first crank". What was odd was that there was no fuel supply. Not being prone to seeing religious icons in the reflection from a shiny diesel, I felt sure that the "0.1 hours" on the meter was from a test-run at the Beta factory and that there was elderly but still viable fuel somewhere in the injectors. Or it was Neptune pulling my leg. Regardless, I shut her down quickly...all I really wanted was to spin the starter.
 |
| The fuel lines are in a somewhat unexpected place, but it's accessible. |
Having not found precisely what was depicted in my documentation, namely "fuel in and out" (diesels return unburnt fuel via a "return line" back to the fuel tank for further exploding later on), I called in the redoubtable Captain Matt, who was in a perversely gratifying way, about as baffled as I was as to where certain things were. The presence of split loom on fuel hoses, making them look like bundled wires, he found unorthodox, but between the two of us, we followed the hoses back from the obvious spot of the fuel filter and sussed out how to hook it up. Which I did.
 |
| NOT TO CODE |
Now, there is 100 gallons of diesel in the fuel tanks in the keel, but it has been there for some years. I needed, for static and dynamic tests of my diesel installation, a small amount, say 10 litres, of
fresh diesel. So here's the yellow jerrycan bungeed into place, with the hoses clamped more or less securely. I squeezed the bulb, I primed the little lever, I checked my Big Deal Battery Switch, and hell, yes, the diesel ran. Eagerly.
 |
| There should be water hitting that water. |
But there was an issue. My seacock was open and there was water in the Perko strainer, but no sign of it leaving the boat having cooled the inferno-like exhaust gases of the modern diesel. Having burnt up an Atomic 4 in an ignominious episode in the swaddling days of my boat-owning career, I knew "no aqueous throughput" was an issue. So I shut down again.
 |
| I've had to get inventive working alone. This is holding the Perko seawater strainer at the precise height I needed to reposition it 2.5 inches lower. |
The next day (because I work for a living, and I need to mull over the possible solutions), I checked the strainer and the level of the water seemed a little below the intake and output hose barbs. I thought I might have mounted it slightly high, and while I knew the impeller on the engine could create some impressive suction, why make it work too hard? So I lowered the Perko 2.5 inches, based on where I suspected the waterline was.
 |
| About $250 to replace the entire pump. This compares to $450 to replace the Sherwood F-85 pump on my old Westerbeke. |
Then I had to inspect the impeller, because running it dry might have damaged it. At the same time, I verified the pump model so I can get a proper service kit for it and some spare "run-dry" impellers. Ya never know, but ya should.
 |
| Sometimes when you shut down, the crankshaft will reverse a half-revolution, leading to "backwinded vanes" |
The impeller looked OK, but I will probably pull it and keep it as a spare and put in a Globe "Run Dry". As one does.
|
| That's just hot air, much like this blog. |
So I fired up, briefly, again. Still no water out of the exhaust. Shut down. Ponder. Wonder if there's a blockage in the standpipe. Unscrew the cap. Here the hissing of inrushing air, suggesting a partial vacuum. Ah, of course.
 |
| Looks like a Dalek's gotten into the bilges. |
I attempted to "plunge" the standpipe with a boat hook, and then to "blow" it with some hose. And I quickly learned about displacement, although with less "eureka" and more "where's the friggin' teatowel?" And I pondered. I dreamt about the standpipe like I was the sickly, questing Frodo and it was the Eye of Sauron longing to thwart me.
 |
| LOOK INTO MY DEPTHS AND DESPAIR! |
Basically, this was foreseeable. The boat has been immobile at a sunny dock since April. There's probably a reef or eight feet of weeds under the boat, and all varieties of water creature may have set up house. So I needed a plan.
 |
| Meet the 'plan': a bottle brush on a boat hook |
Some vigorous scrubbing and cursing later, followed by more scrubbing and the formulation of Plan C (switch the engine intake hose to a different T-off/barb, of which there are four), I declared myself ready.
 |
| And lo, the throughly mixed exhaust moved upon the face of the waters. |
In short, it worked. Plenty of throughput. All readings nominal. I put the hydraulic transmission in reverse. The shaft spun. Nothing fell off. Nothing leaked. Smoke did not emit. Whoa, she pulls fiercely against the dock lines.
 |
| The author pretending to have another idea. |
Tomorrow, I motor.
 |
| I was too busy remembering how to steer 15 tonnes of inertial mass to over-emote, but this was clearly a big deal. |
UPDATE: 2014.10.03: The first hour of driving back and forth, stopping with full reverse, tight turns at speed and general "hovering' is complete. While the Thordon stern bearing squealed a bit at first (and during tied-off in-gear testing at dock), it soon freed up. First impressions are "holy crap, I can stop and back down a lot better" and "I really like this hydralic shifting". Not to mention that had the engine bay hatch been down, I would have heard very little diesel noise, as the AquaDrive and soft mounts reduced motor vibration significantly.
Capt. Matt, who was aiding and abetting, particularly in the docking and undocking, seemed very satisfied with today's efforts. He understands better than anyone what a long road it is to semi-competence, or at least, to leave "the horrible warning zone".
 |
Your correspondent, not entirely visible at the helm. Please ignore the wayward tarp...it's there to cut the heat on an uninsulated metal pilothouse roof. Also ignore the dirt and dust: I'm refitting beside an airport, after all.
|
I freely admit that I am pleased with myself and I won't deny it. I may open up the good stuff tonight.


