Copyright (c) Marc Dacey/Dark Star Media 2006-2020. Above photo (c) Marc Dacey. Powered by Blogger.
Showing posts with label AIS. Show all posts

2019-02-03

Going somewhere?

It's odd to hope you never see this deployed in earnest, or in the absence of the main vessel, really.
Having a freer hand with the boat gear purchases made the recently visited Toronto Boat Show reviewed last time a lot more fun than usual. But I've spent a lot of time in research/review mode, as well, trying to make the best choices in gear for our vessel's voyaging. First up of the "big buys", if just about the last to arrive, is the Viking RescYou six-person liferaft. Last to arrive, because the clock starts ticking on the service schedule from when the raft arrives, and we don't need to mount this until after we launch in late April. We also got the rail-mounted cradle and the "hard" container, as this isn't something I want to muscle out the companionway if things go pear-shaped. We already have a ditch bag and are debating its contents, but a handheld watermaker is already in there.
Now, to rig jacklines and bolt padeyes in all the right places.

Continuing on the safety front, we now have a pair of Wichard ProLineR 2m/1m safety tethers. I picked this version for flexibility as I plan on installing Kong Tango carbiners on jackline webbing as needed and snapping onto that. This allows the smaller shackle to be used on "static" clip-ons, such as padeyes on the mast tabernacle or wire. A shout-out to Attainable Adventure Cruising, which has been, as in so many other areas of offshore sailing, a source of great value.
Self-rescue the better way.
Now, tethers keep crew on the boat, when used effectively and without exception. But you'll see the problem inherent in the system: human behaviour, plus simple misfortune of, say, tripping off the boat. There are a number of ways to address this, starting with "always wear your PFB on deck. Always." Now, after that, the options multiply. We've had PLBs (pictured is the successor to ours), and we have liferings and throwing line slings and danbuoys and assorted means to retrieve a COB (crew overboard). But the device pictured above is a step beyond.

Arguably, the most dangerous time for a crew is watchstanding at night; smaller crews, as ours will largely be unless we pick up crew, will have the nightwatch hours split into two or three shifts, at least one of which will have only a single crew, tethered on deck, awake. Should a crew fall off the boat, this AIS MOB1 will not only transmit to the AIS receiver on board, it will also send a DSC alarm to the VHF, which is going to wake up everyone on board. Lastly, it's got a strobe. Save for survival conditions (stay aboard, kids), in which case the crew would almost certainly be awake and tethered and ready for anything, this seems like a game-changer for self-rescue, a topic that has interested me for some time. Fact is, in most cases, save relatively near to shore, the boat from which the crew has unexpectly departed is best placed to get their crew back alive. Search and rescue not only take time, they are generally not available more than a couple of hundred NM offshore. So this is a helpful advance.
Hello, hello? Dinner is ruined!


Now, what about the boat? We could have a medical emergency, a dismasting or a small fire that cripples our ability to make passage. We needn't be sinking. We needn't be taking to the liferaft. But we may have to call in outside help. That when you trigger the EPIRB. I selected this model for its balance of features, and because we also have a functioning PLB and will also have a satellite phone and handheld VHFs with GPSes (as does my watch). We are making it hard to get lost, frankly.

Slightly less capacity, greatly less corrosion, much easier to haul to shore.
Speaking, more or less, about cooking up solutions, we have now a fibreglass propane tank to replace the steel one that came with the boat, which is at least 13 years old and probably uncertifiable. This one will be easier to haul ashore empty or filled.
I can see clearer now and can correct for variation.
These were not strictly necessary as I possess fairly good, if vintage, Kurt Muller circa 1940s 7 x 50 binoculars. But these Steiner Navigator ProC binoculars have a built-in compass and very impressive optics, making buoy spotting or bearings to landmarks very simple, once I figure out how the steel deck affects them. Experience suggests "a lot" for my compact wife and "not at all" for my loftier son and myself...the steel seems to bother compasses to about the 165 cm. mark above deck and then hardly at all.

If you're going to pump with enthusiasm, go hydraulic.

The quest to install the autopilot has taken a great leap with the ordering of an Octopus reversing piston hydraulic pump and a Navico NAC-3 "core pack" and some associated gear that will make helming, we hope, a doddle. More on this as the pieces arrive.
I don't favour Gill particularly, but we've ended up with Gill gear because we've had very few issues with it and it's good value for our money, particular if you buy last year's wonderfoulie. But then we have a dry boat.

Lastly, Mrs. Alchemy is off to Brittany this week to take an RYA course in (very) tidal waters. So in our traditional mode of seeking bargains in discounted foulie gear, she picked up a rather nice set of Gill OS23 jacket and offshore pants at a good price. I didn't make a sound when she got some long-sought-after duBarry sea boots (not pictured as they were closeouts). I remain stuck with Canadian Tire wellies, as nothing else fits me.

And that's enough for now about how we spent our Christmas money!


2018-09-18

The rare instance of actually enjoying the vessel

We are coming around to the "no instruments on deck" idea...maybe a compass and maybe a tablet holder to show course, but not "the bridge of the Enterprise" as that distracts from keeping watch. Ignore the not-to-code propane tank...it's empty.
The day started with legal stuff, and then semi-related banking stuff. Then cleaning stuff (the never-ending aspect). But there was still enough hours and (more or less) enough wind to attempt a "let's get reacquainted with the boat" two-hour tour. Because we haven't sailed in weeks. We've done a bit of boat work, and we've been down to check bilges and clean away sad cobwebs, but there's been little time to actually get off the dock and move about on the water. So, despite a lingering cold and impressively hacking cough, off we went.

I'm still giddy at how accurately Marinetraffic.com can report our movements, and aware that I will want to turn the AIS off sometimes.
The wind was SSW 9-11, fitful at best, so we didn't crack much more than 4 knots and more often dawdled in the mid-three range. But that was undemanding and there were few other boats out, despite the weather being very warm and sunny for mid-September.
Outrunning a Hunter 24 was not difficult, even for a barge such as ours.
Save for the occasional plane landing nearby, it was quiet and cool. What a difference to the sorted chaos of the last couple of months. Regretfully, we have only a few weeks to enjoy this, as haulout is early this October, on the 19th/20th weekend, meaning I'll have to haul the mast a week or more before that. We may try to squeeze in a trip to Trenton, where our new house is, in the first week of October, but that's about that for the season.
Mrs. Alchemy's head, diesel jerrycan and Toronto skyline: a fairly representative prospect.
Gratifyingly, we still know how to sail. Nothing failed, no leaks, no engine blips and I laid the boat right on the dock upon our return well enough to see the missus step off with two lines and no waiting.
A bit loose as the wind merited it. The little grey blotch was a wasp starter kit.
I've started a somewhat frightening to-do list for the winter that will be the subject of another post soon. I recently heard an Andy Schell podcast with sailor Paul Exner, who has had to rehab his damaged boat after Hurricane Irma and sail it to a new phase of life in Hawaii, in which Exner defines seamanship not only in terms of knowing your knots and your splices, but in terms of time and labour management, as both are finite resources. I found it a rather compelling proposition.
Could we have gotten a pointless 0.8 of an extra knot with the staysail up? Guess so.
All in all, a beautiful, relaxing break and a mild injection of peaceful fun to remind us why the hell we've been subjecting ourselves to such levels of disruption on the home(s) front. It's for the greater good.

Yelling out "STARBOARD" not necessary in this case.
Now, I also reacquainted myself with an issue that is fixable, but remains a touch ambiguous in terms of "best fix". I have reason to believe our engine is significantly over-propped, which I can fix at haulout easily enough, but I would like to get my pitch numbers right. With a low-hours Beta 60 and a clean, if heavy-displacement, steel full keeler, I hit cruising speeds at too low (1800 RPM) a throttle settingand can't get above 2,050 RPM in relatively flat seas when I hit hull speed under motor. I do not have evidence of overheat or overpressure, however, which is good.


I've input my numbers into this worthy app, but the fact is, I have a 19-inch four-blade feathering prop (a Variprop D-107) on a steel full keeler and that isn't going to change. What can change is the pitch of said prop in forward (overpitched in reverse means I can stop and back down "with authority" and I don't care if I'm lugging for 30 seconds). But I do care I can't get the engine revving at hull speed a full 600 RPM short of its rated max, meaning unneeded strain and poorer fuel economy at cruise speeds (75-80% WOT).
The prop in, and with, question. Works like a charm otherwise.
This adjustment of pitch is probably a drop from the present 15 inch pitch to 11 or 12, but I'd rather do the math before I tinker with the stops in the hub. As a side note, everyone unhappy with their fuel burn or their RPM at WOT should understand this topic as it really makes a large difference in terms of efficiency and wear. There's even books on it, but I really just need to experiment at a slightly coarser pitch than the app (a very flat 10 inches!) suggests.

2018-05-20

Comms 'n' sea

The baffled cat, "Shadow". Much as I would like to bring her, she's not coming on the voyage. Wouldn't be fair, and likely would be fatal for the cat.
Leading with a cat photo should not only get me some cheaply earned hits, but also suggest I am capable of whimsy. Which is true, but not often when it comes to the boat. However, I'm willing to make an exception when it comes to my cat, who only goes into the entirely wild yard under supervision.
The Vesper XB-8000 AIS transceiver booting up. All the wiring is loose (and the holes in the pilothouse unsealed) until I can route said wiring back into the pilothouse roof, which will be thereafter fastened down to the pilothouse frame for the first time in ages.
I, on the other hand, tend to work solo on the boat. This is because Mrs. Alchemy works at a distant wildlife centre for stupidly protracted hours, particularly in fertile spring, and I work from home upon request as an editor. Which means, in practice, plenty of work some days and bugger off  by 1100h others. That's condusive to boat work, which is why I haven't worked in an office since I got into boating in 1999. Sincerely, what have I missed? Oh, yes: NOTHING.
Had to download some USB drivers, but otherwise, this installation of Vesper Marine's software was a doddle.
Anyway, in a week that saw, as part of our house-sale process, the acquisition of a stackable washer-dryer and the transport of same about three kilometres by hand cart and shoe leather (we lack a car and rarely miss one, save for when we have to do this sort of First/Third World transit), I was able to drill some strategic holes and get both the radar and AIS cabling inside the pilothouse. The cabling is sloppy and excessive because I have yet to decide where to mount the AIS module and the radar display...to think I thought "I wonder if it's big enough?"...damn, it's huge from 45 cm. away.
From marinetraffic.com, evidence that Alchemy can both see and be seen, at least in terms of AIS. And yes, I turn it off when I leave the boat. I actually have no interest in pointing out where I keep my tools.
The AIS setup was pretty straightforward, save for the usual search for the USB drivers and the paranoia surrounding the correct inputting of the MMSI number. However, all went well and, as seen above, we are now transmitting a Class B AIS signal, complete with some related data attached to our MMSI number. Huzzah! I didn't screw up the mast connections!
Boat, as seen from the boat. It's all a little meta, isn't it?
Sure, English, but just this once.
The Furuno 1815 manual and related guidance (note the "quick start" flip cards to the left of the above photo) are excellent, if densely detailed. Because I tend to learn by doing, I will likely take the now rigged-for-sailing boat out tomorrow to play with the radar controls and see what I (literally) see from a few miles south of Toronto.
The first sweep. Of course, inside a basin next to about 300 condos, plus a tree line, it's a dog's breakfast.

The radar is complex in terms of the variety of tunings, ranges, guard rings, and display options, but not dauntingly so, and on first glance it seems very much what the skipper ordered. What remains to be done is linking the plotter via a to-be-purchased NMEA 2000 patch cord to the AIS unit, so that AIS targets (and their calculated distance away) are visible on the plotter. I may also link via the secondary NMEA 0183 wiring the radar to the AIS, so I can have AIS information available on the radar screen. What I won't likely do is have radar "layover" on the plotter...I think that would be visually too distracting and I want to keep radar church and plotter state separate for now. Still, a good few days' work.


2018-05-17

Sticking around

That big radome doesn't look so big up there and seems like it won't interfere with the sails when tacking. That rescue hook is not part of our rig, but of our dock.
When I last posted, it was about an unexpected day-long power outage during which our frozen and refrigerated food was saved by a portable generator. Today's post is about the extensive modification of the mast prior to putting it in, or, in the case of our deck-stepped mast in its tabernacle, on Alchemy. Said extensive modification involved the running of four lengths of wire (two 1/2" thick LMR-400-UF cables for AIS and VHF antennas, one 18 mm Furuno radar cable and one 1/4" UHF-style GPS cable). This proved to be...tricksy.
In order to get a greater bearing surface for the AIS antenna mount, I added a bit of scrap teak to an existing teak pad on the spreader. Saved drilling fresh holes in said spreader.
The prior RG-58 VHF cable was inside a cable-tied length of nasty foam pipe insulation, along with several 14 ga. wires for the various mast-mounted (and now LED) lights. So while I could clip the PL-259 connector from one end and pull the cable out of that half-assed loom (presumably to reduce mast noise and halyard abrasion/fouling, but a pain in the ass for us), I could not use it to "fish" new cable. In addition, the new cables, save for the wee GPS run (which is part of the Vesper XB-8000 package) were considerably bulkier than is customary on Lake Ontario, because they transmit more power to the antenna with less signal loss, a worthy ambition for the prospective offshore sailboat. So that meant cutting holes in the mast large enough to get them in.

Five screws, tidy heat shrinking and no sharp radius. Should work well.
So I had to get inventive. In my garage of Too Many Boat Things, I found the 1/4"(6 mm) forestay to Valiente I had removed in 2013 when I rerigged. I cut off the terminals and I had abour 40 feet/12 metres of reasonably stiff wire. I drilled the VHF hole in the top plate of the mast between the sheaves and, with the coax taped to one end of the forestay wire, carefully pushed it down the mast. Carefully, indeed, because it's a busy area in there and I did not wish to foul halyards or that grubby, if still functional, foam loom of 14 ga. wire.
This is the Scanstrut LMM-2 gimballing radome mount. It's pretty slick, but I had to be careful to get it centered and rivited correctly.
After I learned I could spin the stay to get it past obstacles, the work went slowly, if productively. Together with Mrs. Alchemy, we fished the four wires to the appropriate mast-base exits. After that, it was time to do the radar mount.
A total of 12 3/8" pop rivets are holding this on. Feels pretty permanent to me.
This was mostly just careful work and following the IKEA-like instructions from Scanstrut. Then the usual routine of inking the right spots, using a  nail punch and hammer, followed by the use of a small drill bit and then a larger drill bit, and then the riveting. It took about three hours.
The Vesper AIS's GPS receiver is mounted on the same gimbal as the radome, nice and high.
May we never heel or pitch-pole this much! But I'm ready if we do.
Loads of crimping, chafe-guarding and tidying up later, we moved the mast to the Place of Hoisting.
Two of the delays in getting the mast in were the realization that Alchemy was pointing in the wrong direction and that the mast had to be craned on its "back"
Because I have so many stays and shrouds and must mount rather exactly into the tabernacle, the crane activity can take longer than the allotted 30 minutes per boat, and it's to the credit of my friends who helped me that certain slowdowns (like the inability to retrieve the hoisting line) were dealt with in such a patient way. I need to tell the crane operator I'm going to need an hour next time.
Alchemy unbound: waiting for my turn.
Some frustration, followed by a round of beverages purchased to mitigate frustration, later, Alchemy was back at her dock with shrouds and stays provisionally tensioned....which reminds me, I need one of these.
Nice! Got the full-length battens in unassisted this year, which is always a little tricky.
So the jib and staysail are now in place, as well as the rather good-looking mainsail pictured above. I declare the season underway.  The next steps will be drilling fresh holes in the pilothouse in order to route all those cables to their new devices.


2018-04-15

Droning on about drones

Vista enhanced: The view from a drone. Photo still (c) http://www.captaincurran.com/2014/11/how-to-fly-drone-from-your-boat-1.html
Small, reasonably priced, remotely controlled (by either smartphones or dedicated console) camera drones are not just for annoying people and pets in public parks with their high-pitching whining. For the cruiser, they offer some practical advantages...if you can keep them free of the rigging. Not to mention your delicate flesh.

The advantages of the drone aboard the cruiser go quite a bit beyond boat selfies and bringing a bit of local colour to one's passagemaking blog. Some of them can be flown in fairly stiff breezes (although retrieving them can be tricky), and a range of several miles, using drones as "eyes in the sky" could reveal approaching weather or marine traffic, or even, when used as a "virtual crow's nest", reveal potential obstacles, such as wrecks or coral heads, that could ruin an otherwise beautiful lagoon visit.

It's important to note, however, that most drones are limited by their software as to the altitudes to which they can ascend; this is for practical reasons, such as the safety of aircraft, which also restricts drone operators as to where they may be flown at all. At sea, however, and away from land-based air traffic, there are fewer restrictions beyond battery runtime. Even so, a height of 100 metres is significant from sea level and is five to six times higher (and therefore gives a great "height of eye" distance to the observable horizon under fine conditions) than even the view from the top of the typical mast. For instance, our approximately 15 metre tall mast on Alchemy allows me to see an object of sufficient size on the horizon at 13.8 kilometres away; 100 metres of altitude on a drone would allow nearly 36 kilometres. And that's for relatively low objects; a ship of sufficient height could be seen even farther away, and a squall line thousands of metres tall would be obvious even further away and long before those on deck perceived the dark line of it approaching. This interests me, and not just because I've yet to install a lazyjack setup.
Mast steps galore: The smaller one's feet, the smaller the step can be; but the shorter the crew, the closer they'll have to be. Photo (c) Don Street/Cruising World.

In the past, the only way to get this sort of vantage point was by sending up the sharpest-eyed crew on mast steps, which was more convenient than just a bosun's chair alone and arguably safer as the last ones at the mast top gave the crew a place to more or less stand while repairing light fixtures or other mast-top fixtures, or examining standing rigging or freeing a snagged or damaged furler part.

The most esthetically pleasing mast step, as well as the least-likely to snag sails or lines, is the folding type.
But mast steps add weight and complexity aloft and can be expensive to purchase (depending on how many you require, which is a function of leg length and mast height) and laborious to install. (In the link provided, the fasteners are rivnuts, which I use with the solar panels; rivets or tapped machine screws are also possible choices). There's also a concern present in my mind of putting so many holes in one's mast and whether that has a compromising effect on its strength.

I would not hesitate to place a pair of mast steps near the mast top (particularly ones that are simple to fabricate, would be unlikely to snag anything, and would fit my huge feet), because I can see the point of that when combined with that bosun's chair. But installing mast steps all the way up just to get a better view? Perhaps the drone as nav aid makes more sense. Much as AIS complements RADAR, it strikes me that a live feed from a drone ahead of the boat would complement the forward-looking sonar we are already using

I think that the most productive use of drones at sea, apart from littering one's blog with stunning aerial shots, would be in noontime approaches to gaps in reef walls to confirm the least-tricky turns and the presence of uncharted coral heads. It was about two years ago that I realized drones were becoming cheaper than a full set of mast steps, and, because they can look directly down from well in front of the bow, are better for spotting keel-threatening hazards. I can easily see when an overlay of GPS co-ordinates and virtual AIS markers could use live drone inputs sent directly to the plotter so the tech-savvy could steer safely in undercharted areas by "live charting". Perhaps someone is already doing this: it seems like the future.

Logically, the most compact drones with the longest ranges and flight durations would be preferable for onboard use, but compact and long flight times don't always appear in the same models. Another consideration is the danger of losing something that costs one thousand dollars or greater into the salty sea; few current drones are capable of water landings (or take-offs or easy COB-style retrieval) and that's also going to restrict their use to fair weather and plenty of on-land practice prior to on-deck snatches) and the ones listed here seem too toy-like (or expensive) to take to sea, or to crash into it.
This is indeed wee. Photo (c) Steve Mitchell/Sailbits.com

Ocean cruising is a niche activity, and drone use during it is a niche of a niche, so word gets out quickly as to what works and what doesn't. A popular drone maker, and not just at sea, is DJI; their Mavic Pro and Phantom models seem to have quite a few fans, and I like how compactly the Mavic model can fold down to the size of a shoe for stowage. In January, I attended a rigging seminar with Andy Schell and Mia Karlsson of 59 North.com and the good ship Isbjörn. Andy and Mia run a popular charter business aboard their Swan 48 and they travel to some seldom-frequented latitudes worthy of shooting in high-definition with their DJI Phantom drone.
The DJI Phantom 4 drone: It's the handles you want to reach for.


After the seminar, which featured quite a lot of cinema-grade footage of Isbjörn underway, I asked Mia about the Phantom's performance parameters. She suggested the "big loops" of the Phantom model seemed superior in terms of safe retrieval; its maneuverability, being a larger drone, made it easier to control. I was surprised to learn that the drone could be flown easily at 15 knots apparent wind speed, although Mia suggested this was a big power drain and made retrieval increasingly difficult. 

There's plenty to consider before we ante up for a drone, but I think before we leave, I will have it sorted out for consideration as another useful tool in the navigational armoury. After all, if it's good enough for Paul and Sheryl Shard, who am I to disagree?

2018-02-14

I ♥ my new radar

She's a big 'un.
As the snowy weather, some welcome work and a minor surgical procedure have me sidelined this week, I thought to unbox the new Furuno 1815 4 KW radar I intend to bolt to Alchemy's mast in late April. The kids seem to like it.
Always good to know.
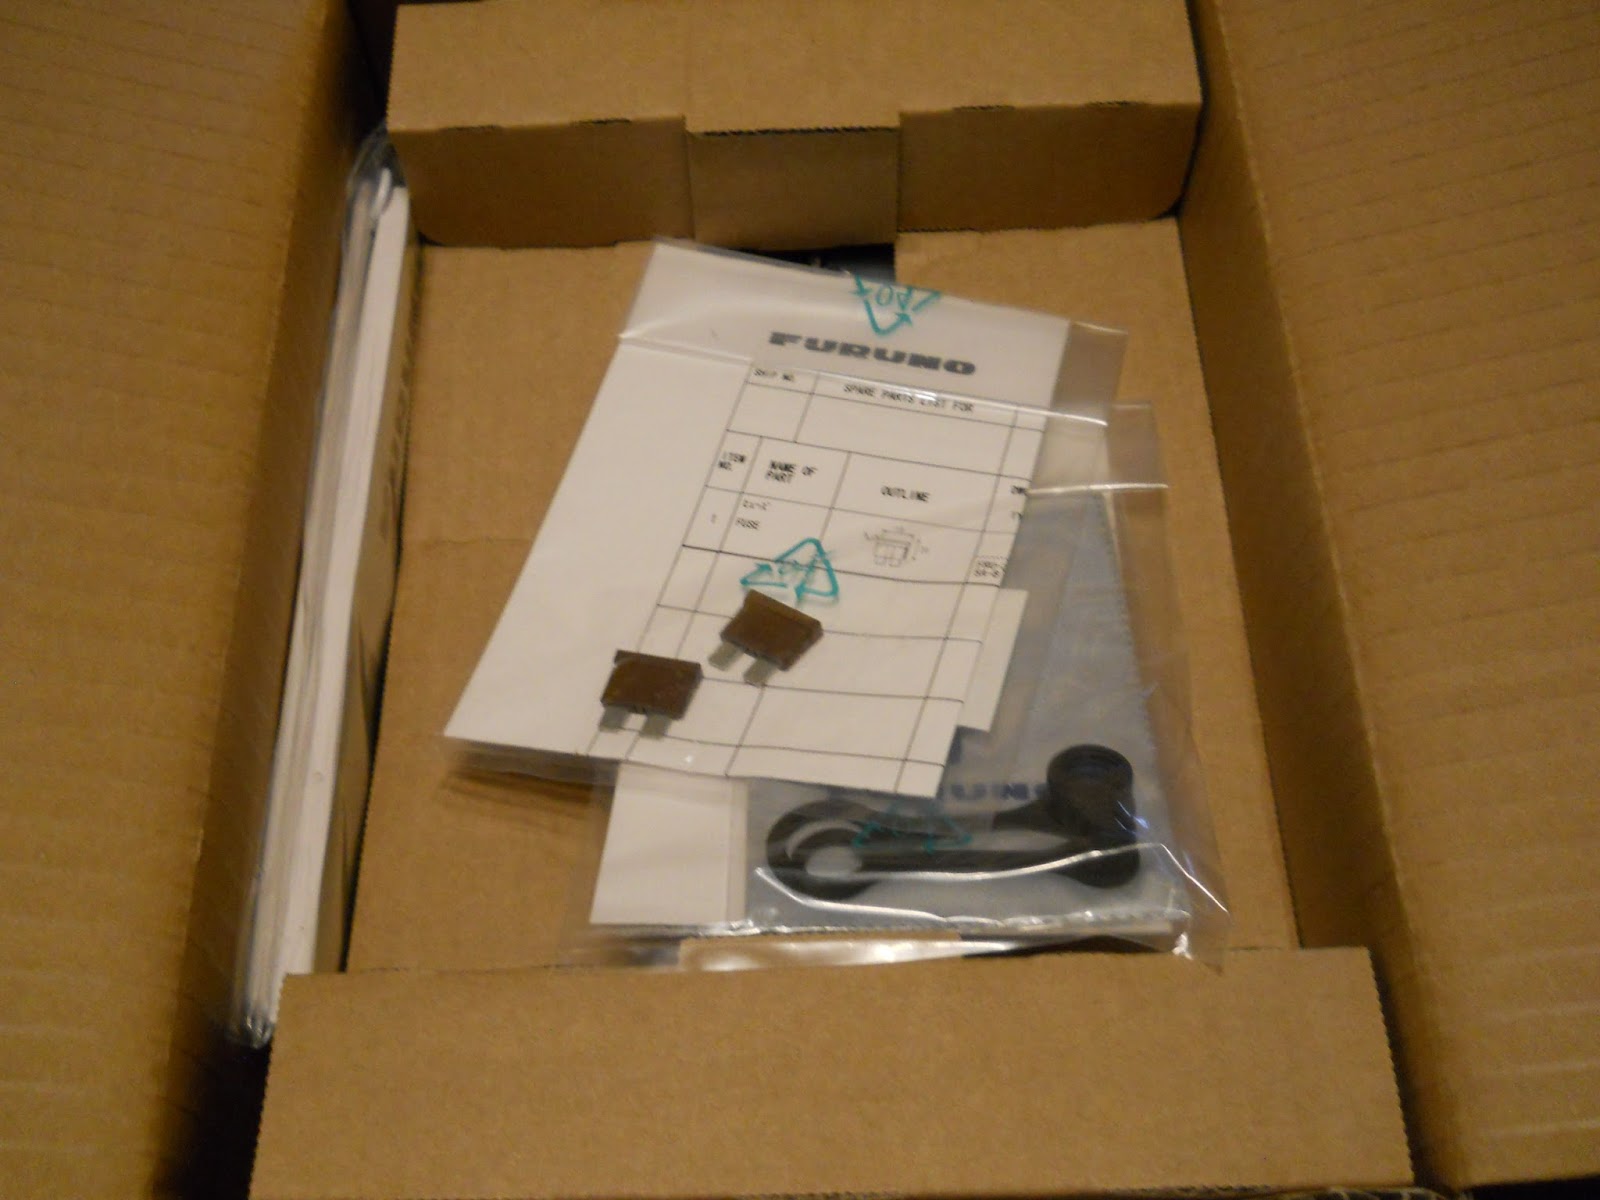
Furuno gear is as well-packed and organized as any higher-end Japanese gear I've encountered. The "important information" is undoubtedly online, but it's a nice touch to include the info in the box, because it would be HUGELY ANNOYING to get the radome up the mast, attach all the requisite wires and then get nothing, or the wrong thing.
Do NOT unwrap prior to installation.
The default power/data cable is 10 metres in length. This may well be enough to go two thirds up the mast, down to the deck and into the pilothouse, but I'm going to have the seller exchange this for a 15 metre length (it's coming in next week or so in another shipment) and I will hand this one over. I would rather have too much than too little cable; for instance should I for some reason wish to take the radar display aft to the outside helm, I'd use most of that 15 metre length.

There's a packing list and templates for each compartment in the 25 kilo box.
The chunkiest part, of course, is the 4 KW radome, which appears to be of the 19.2 inch form factor. The other model I was considering, the Furuno 1835, has a 24-inch dome that's heavier. The range is similar, however, and the power rating is identical. The difference between the radomes, for those of a technical bent, is as follows for the 1835: a horizontal beam width of 4.0 degrees and a vertical beam width of 20 degrees. The equivalent numbers for the unit I've purchased are 5.2 horizontal and 25 on the vertical. Both units work from 0.0625-36 NM in range, although the higher, the better, if you want that distance range. You may calculate your own potential range here.

These numbers break out in interesting ways: the higher the horizontal beam width, the lower the discernment or "sharpness" of the display. The vertical beam width, on the other hand, should be desirably high to account for the typical pitching of a sailboat at sea. The heeling, on the other hand, is dealt with by a self-levelling radar mount. I'm getting this one.

The main use for our radar will be twofold: seeing marine traffic on passage and seeing weather around us. I'm more interested in distance (hence the 4 KW radome, although the draw is reported as just 38 W) than I am in spotting a stick in the water a mile ahead. The nature of the sort of sailing we intend to do is largely high seas: radar buys you time. That said, this radar can be tuned to a pretty tight standard of seeing canoes and geese at 3 AM in the fog 1/2 NM ahead, should that be necessary. But I have seen radar used to steer between thunderheads and localized downpours, and I think this radar will excel at that.
I expect great things from you, radome.
There was no need to unwrap this radome prior to installation: this was just a check. 
Thorough, aren't they?
The 1835, which a few ocean folk have recommended to me, is a pretty sweet unit, but the 1815 debuted in 2017. It "paints" AIS targets more readily and has visual clues, such as "True Trail" mode, which visually suggest the speed and vector of objects of interest, such as radar targets that are also AIS targets.
The AIS info at the bottom of the cursored vessel is smoothly displayed with the radar return.
Rain and storm clouds and squall lines provide variable returns, although they are often gratifyingly tall enough to  be seen beyond the nominal distance limits of the radar. The same can be said of masthead-mounted AIS: it would not be ridiculous to "see" the AIS data of a fast-moving container ship at 50-60 NM given that its own antenna might be 60 metres off the surface of the water. AIS is also in the VHF band; certain atmospheric conditions can cause "skip" and multiply the occasional reception by several times. I once heard, for instance, the U.S. coastguard in Cleveland, OH in Toronto...on my handheld. It didn't last, but it was an example of skip. I wonder if an AIS target, ported to the radar display from my Vesper transceiver, would show up on the screen not as a "blip", but just as a contact on the lower half of the display? I'll enjoy playing with this, I can tell you. Someone else will have to sail!
It's possible to avoid a lot, but if you can't, it's good to have some warning of heavier weather approaching.
Above is the "weather" use of radar. The 1815 has a full manual mode, which, having fiddled with older radars and radios, I'm accustomed to using. I look forward to this as well, because I want to see if radar can spot certain phenomena, like "clear-air squalls", I've experienced at sea. Or maybe it was a microburst. Anyway, a bit of warning would have been nice, if that's possible.

The wires that go into the display. I have to run right-sized wiring to the display unit, but the draw is pretty low: 3.2 A
The plan is to have the display at the helm. While this unit is supposed to be either helm-mounted on a pivoting base, or flush-mounted into a nav station bulkhead, I am going to try to mount it on a strong armature from the pilothouse roof. That way, it can be tucked away and secured when not needed.
More fuses and covers and literature.
My plans to do this, however, might have to change if the radar display affects the helm compass, which is actually pretty accurate (locally, at least; it will almost certainly have to be swung in the Southern Hemisphere).
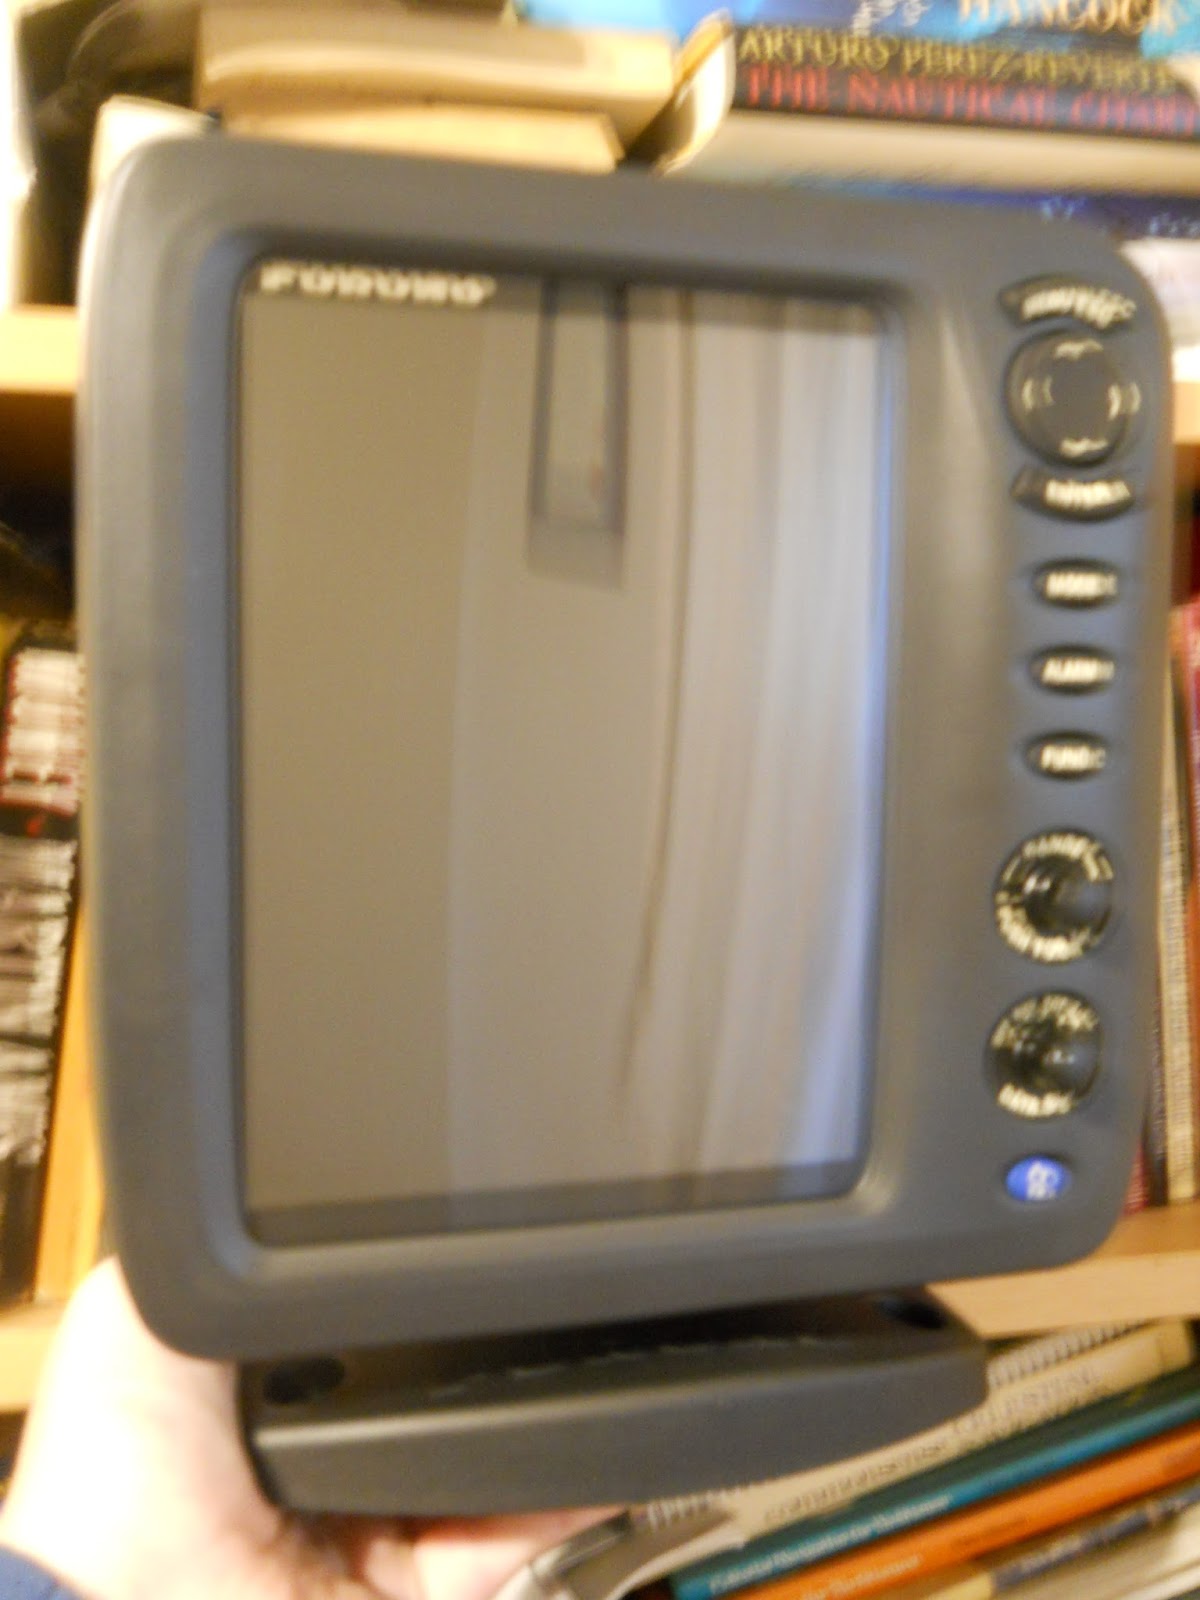
I was concerned this unit would be too small. My hands are large: I need not have worried.
The display unit itself is 8.4 inches top to bottom. That seems small, but I had a good look at it, as did Mrs. Alchemy, dragged over from her Boat Show gig as temp worker at a chandlery, and while there's a lot of information on the screen, it's easy to read. Again, this is most likely going into the pilothouse and will be closer to our eyes, should we wish, than the plotter will be, and it's only seven inches wide.
Sorry for the focus; I should've used the flash.
The back of the unit is pretty simple and robust. I'll post about it again after it's installed and running.
Oh, the places you'll go and you'll see their outlines first!
In the meantime, insurance survey time has come around again and there is much to do aboard prior to that expensive but necessary exercise.