Copyright (c) Marc Dacey/Dark Star Media 2006-2026. Above photo (c) Marc Dacey. Powered by Blogger.

2017-04-09

Gas spring hatchling and unsound methods

Warning: plenty of pictures in this one.
The redoubtable Mr. B. finds his groove.
When last we left the matter of the engine bay hatch, welder and fabricator and fellow National Yacht Club member Andrew Barlow had made the lid. But more was required on both our parts to finish the job.
Making the "towers", pieces of angled steel bar stock that will support the lower part of the gas struts.
Andrew made the cross-piece, removable if needed, that supports the far end of the new hatch. My job was to trim off the excess bolt length and to apply Loc-Tite, etc. The division of labour is that he does what I can't, which is to bend and expertly weld custom fabrications. So far, so good.

There's a nicely shaped plate underneath at either end tying the lip of the hatch together. The aft par will serve a future job.
The old plastic stand-offs and related adhesives were scraped off, and the hatch "lip" or "flange" (I tend to waver on terminology) was scraped, "Multimastered", sanded and recoated with galvanizing paint and a topcoat of cheap Tremclad. That parquet floor is leaving, by the way. It's nasty.
Just another chaotic scene in the pilothouse.
I put Loc-Tite of the milder sort on the threads in case I need to get the engine out. Which I hope never to do. I might need to remove this to get new water tanks in, however.
That piece fit perfectly first time in. I was impressed.
I Dremelled off the SS bolts close to flush as they will be below EPDM rubber stripping to keep the new hatch from damage and dissimilar metal issues.

My job involved some tricksy measurements avoiding both the structural members of both lid and pilothouse sole in order to find the appropriate places for mounting holes for the McMaster-Carr-acquired stainless steel piano hinge attaching hatch to boat. I needed to acquire a metal countersink so the bolt heads wouldn't dent the lid when closed. Lee Valley had a nice one.

Cleanup of the piece involved a light grinding to remove burrs. Yes, a wire wheel would have been better, but it's stainless and it's buried!
The labelling is because I am a touch OCD. An arrow would have sufficed.

The hinge finished, it was time to attach lid to boat.
Stainless steel piano hinge, courtesy of McMaster-Carr.
Further tricksy measurements to get  both sets of mounting holes away from each other AND lined up so I could blindly get nuts and washers on followed. My Makita torquey drill was of great help. That steel is 3/16" thick, I believe.
The tarp is to keep paint off the motor, metal shavings out of the bilges and to catch stray dropped things.
Mission partially accomplished! The lid, with the temporarily restored plastic stand-off, closes properly. Now I needed to wait for Andrew and his portable welder to be free for the last part of his work. So I put a hole in the hull, or rather, revealed an existing hole to the outside world.
I have no idea how this surround worked. That once-clear disc is a thick piece of some sort of acrylic.
When we got Alchemy, there was an antique (late '80s) "Video Depth Sounder" at the helm, literally a small monochrome monitor thingie that showed a rather primitive outline of the bottom and a (presumably correct) depth in little yellow numerals. It didn't seem in great shape, was huge and gobbled amps, so I got rid of it. The transducer to which it was attached, however, remained in place.
That's a milled aluminum "bullet" on the lower part, and epoxied wood on top, angled to the hull.
 This is the transducer housing, a bit draggy despite the pointy bit, I would think.
Prepatory to getting a new, current sounder, more of which I'll discuss later, I had to get the old one off. Full on grinding commenced, and I discovered half of the housing was fairly substantial aluminum. Not sure about that on the steel hull, with a brass transducer in the middle, but at least the part above was "something else", epoxy-soaked slivers of plywood shimmed in to make the protrusion straight up and down. I will prefer to do this all on the inside, I think, with an HDPE block and compression fittings.
This was immediately cleaned up and repainted. The wires will be better secured, too, after the tanks are put in.
Luckily, the hole was a standard one-inch one, which should fit the new transducer. Tricky bit will be mounting it vertically so that it reads perpendicular to the centerline of the boat.
I can take rough numbers from this for the block necessary on the inside to orient the new sounder properly.
 Old sounder retained for reference, I cleaned up the hull plating around the hull.
It was odd seeing daylight through the bottom of the boat. Unnerving, actually.
This area now has four coats of galvanizing paint over it. 
On the threshold of further refitting. Note our old friend butyl tape.
The next fabrication job is a new companionway hatch, which is more elaborate than a simple engine bay hatch in that it will have a hinged flap, gasketing, the ability to lock, to keep all weather out and to keep the boat more secure than a simple dropboard. So in preparation for this, I disassembled the existing hatch framing.
I bet I could have gotten the engine in and out of that without removing the roof! But I didn't know that then.
The "hatch hole" minus the surrounding wood is noticeably larger; the new hatch will take up some of this extra space, but should give us about another half inch of height and an inch of width. Which will be nice. After Andrew came by to run a stainless fabrication by me as a test piece for the new framing, he got to work on the "towers", the upside-down T-shaped pieces of steel to which the bottom of the gas struts would be bolted.

It's not often I tell a man he's got a nice unit, but that little Miller portable stick welder is the bomb.
Andrew's compact if pricy (over two grand) welding unit ran on my single 15 amp line from a nearby standpost. I improvised a fire blanket because the stainless steel welding sticks he was using would have merely melted right through the green plastic tarp, or possibly the top of the remaining starter battery, so caution was observed.
The 'fire blanket" was a dampened canvas sack. Only slightly charred by the end.
About 15 minutes of zapping and eye-averting later, the "towers" were firmly in place and Andrew scribed two spots where I was to drill holes. Because I was doing the rest of this. Andrew does good work, and I would prefer he stick to brainstorming followed by fabrication.
ZZZAP!
 Makes me want to weld more things, though!

The secret weapon: the heavy Makita drill with the Milescraft Orbiter, a sort of gadget to drill in tight spots.
Today was my turn. I pilotholed and drilled the bottom brackets (1/4" steel" and drilled and tapped threads into the hatch's aluminum lugs. These would take the top end of the gas struts I had got from (again) McMaster-Carr.


Again, I'm glad I have a lot of hand tools nearby
 The gas struts themselves are powerful and long. I didn't want this hatch bonking me in a seaway. The trouble was that they needed to be compressed slightly, once bolted under the hatch bay's flange, to get onto the mounting bolts on the aluminum lugs. Eventually, I got one on myself using a massive set of channel locks, but it was easier to ask Andrew to come up so I could compress the second strut from above until he could push it on. Once on, they are unlikely to move.

The above clip is the result. Neat, isn't it? And that fit is beautiful. Eventually, this will be soundproofed, covered in faux teak and holly non-skid, as will the rest of the boat. Parquet belongs on dancefloors, not in pilothouses.
There's further "L-shaped" squishy gasketing that should greatly reduce the motor noise, not that I find it too much, to be fitted. These black strips are just the first layer.
This hatch project (and the coming companionway project and sounder installation) have been a long time coming. I feel good about the work and the focus of the man I hired for the fabrications. I haven't been able to say that for some time.
Even the cat approves.


2017-03-23

Seeking an outlet for the bright ideas, some of which are in my head

The new galley light

Because seeing how much bitters and nutmeg is being added to the rum is essential
I acquire boat gear when I see it on sale like cat ladies hoard...well, cats. Genco Marine had a few shelves of superannuated stuff off their main floor and I got this SS gooseneck halogen for five or ten dollars, I can't remember. Installing it in the galley with a few millimeters to spare for the microwave door was pretty straightforward: I just tapped into the existing 12 VDC panel in one of the galley cabinets and tidied up the run with a few hangers.
There a few of these around the boat. It makes things easier if I only have a short run to do.

The new tool


Electric screwdrivers: I've had a few, and they've often been a disappointment due to either weak motors or poor endurance on the batteries. So far, this one from Home Hardware is a light-duty champ. As will be seen below, I've been doing a lot of wire runs and fastener work in tight places, and this has been very handy. It's got a lithium-ion battery that charges rapidly as well and despite its paltry 8-volt motor, it's got reasonable enough torque to drill brass screws into solid wood.
More moves than a caffeinated gymnast.

Head games


I was asked recently by a fellow sailor about our Lavac head. Frankly, I haven't paid much attention as we winterized it some time ago and haven't been using it.
Rest, my precious! Soon, soon...
When we last did, however, deploy it in earnest, we were reminded it's a very nice bit of kit. The key is its simplicity: its only moving part is the Henderson pump mounted on the bulkhead: do your business, shut the gasketed lid, and pump; a vacuum forms and empties the bowl either to the holding tank or overboard.
The handle points away from the direction of the flow, so it's set, as is required, to "holding tank".
Water is then drawn in from the sea. You have to get the hose heights right, i.e. know where your waterline is, but that's straightforward, and if you are on the lee side, you can draw in less water for less dramatic pauses.
The head sea water feed is teed off the standpipe seacock and up to the waterline, The level of the bowl's contents matches it. Five strokes of the pump does the rest.
Now, the previous (or original) owner cable-tied some AC conduit to the water feed for the Lavac. I find this slightly dodgy and when we update the hose, I will reposition and separately mount the AC wires above the hose. Peace of mind, and all that.
The rarely viewed head exit port and Marelon seacock.
It's good to see the more-or-less hidden parts of the boat. The paint looks pretty good and while I've found some rust in spots, it's minimal and will be dealt with when it's warm enough to paint, which I hope is in a month.
It strikes me that now that we are sailing, I might wish to surround that rather critical hose with some sort of anti-chafe where it passes through that counter.

'Peak power

A long-time ambition to supply both AC (for tool use) and DC (for lighting) to the forepeak workshop has seen some progress despite some inexplicable previous owner finds and a lot of deconstruction. Another long-time ambition, as some of these photo will reveal, is to get a small inspection camera with a fibre-optic lead. If I can see into the multitude of nooks and crannies on our steel boat, I can spot spots of rust before they take hold and can better plan future wire or hose runs.
Overexposed (well, you try taking a decent shot inside a dark cabinet at about 25 cms. without being able to see the viewscreen), but you can just make out some previously run 10 ga. AC conduit to the forepeak, untimely cut some time before us.
It's nice, frankly, to be getting started on the optional stuff, like lighting in lockers and inside cabinets. I'm finding work that is clearly adequate, but which I may gradually upgrade to what I think will last longer at sea and for the duration. Here's an example:

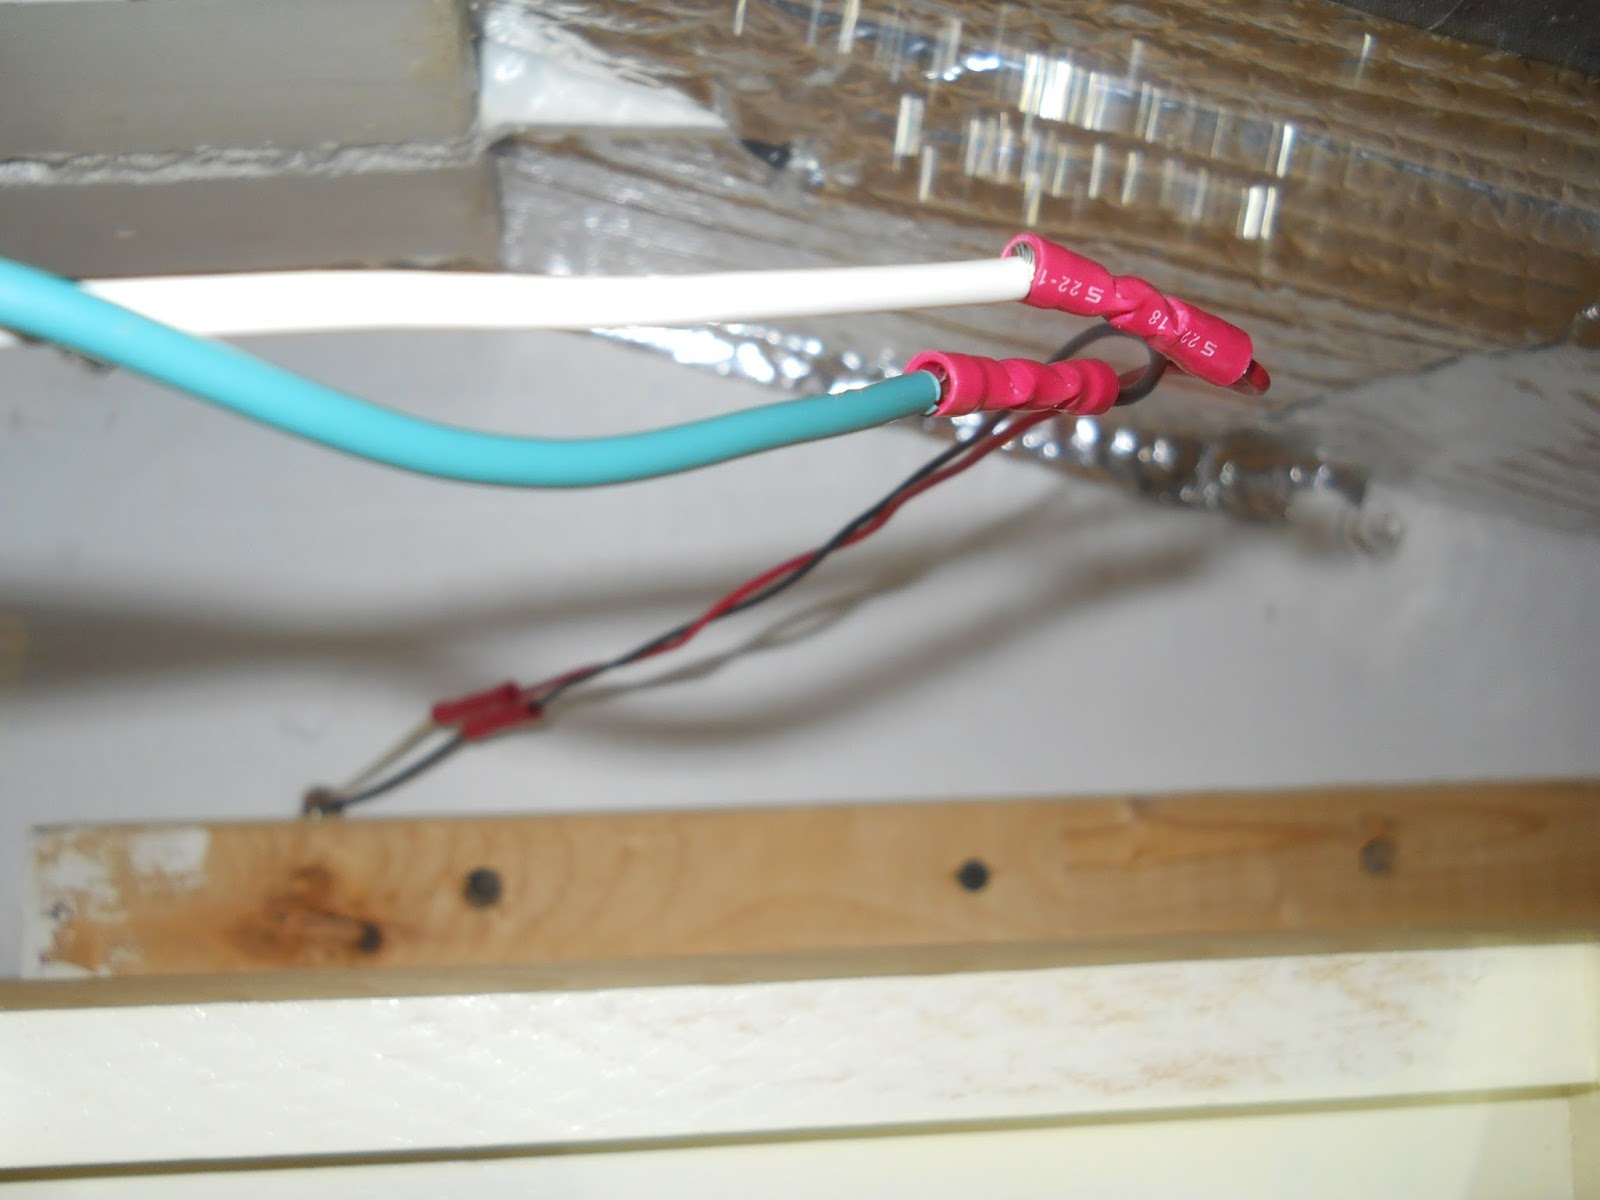
Overkill on the gauge to the terminal strips, underkill on the crimp quality.
You might assume from the colour of the wire (and its relative beefiness) that this is an AC lead. It isn't: It's mismatched DC leads that are powering a fluorescent 5 watt seaberth light. It's very low-draw, but I dislike the decision to have four crimps in what should be a 45 cm. run to the terminal strip.
No, sir, I don't like it, even for a fixture I will retrofit with LEDs the first time it flickers funny.

I would also customarily sleeve any crimp connectors like this which I did need to make with adhesive heat-shrink tubing to minimize moisture ingress and to strengthen the crimping job. Lastly, I would tie this off to both better support it and to act as strain relief; it needn't be elaborate That lead's just waiting to fail.
Good: Foam-glued closed-cell panels and intact paint. Less good: Grandpa's speaker wire, interrupted.
In order to get at the AC line that manifests in the forepeak, I had to see where it went. That involved disassembly of the starboard seaberth surround. The condition back here, which I've never explored, is generally sound; cabling is partially tied to small-diameter grey PVC pipe lengths (containing some 'orphaned' DC runs as well as the DC runs for the saloon forward bulkhead lights) and clean installation of panels and decent, thickly applied two-part paints. Which is nice for us. I will leave this open until I've finished the DC runs, which may involve fishing new, smaller gauge wire (thanks, LEDs with tiny draws!) in case closer inspection reveals places needing paint.
Usually, this is very shippy cherrywood slats.

The AC-to-forepeak saga involved crimping 600 voltm three-conductor, stranded and sheathed 10 ga. marine grade cable to the end of the existing run, for which see above in a cabinet looking futile. I emphasis the "marine cable" part because I still see older boats with Romex house-grade cabling from the '70s. Here in Toronto, we are in fresh water; odds are it will work, but tinned, stranded marine wire can take a lot more flexing than cheaper solid wire that is fine for houses (you'll know what I mean if you change a wall outlet in an old house), but will tend to harden and fracture (and corrode) on a damp, moving boat. As for crimping, I follow the guidance of the recognized sage, "Maine Sail", on the topic, as budget allows. I have some of the tools pictured here and I use them all the time. Anyway, I stripped and crimped new wire to that found in situ, and puzzled over how to get it through three bulkheads to the relevant AC panel in the pilothouse.
The nature of a custom-built boat is always going to be a little ad hoc, but labelling these leads would have saved me some trouble.
Job one is to exit the new lead out of the cabinet above the holding tank to the space behind the cabinetry in the head. It holds towels and related shower stuff, but there's an access panel and two terminal strips on the back of it. The work is tidy and confused and nothing's labelled. That will changer. It's a busy area: the black hoses are the fuel tank vents, which will eventually be rerouted to the centerline onto pilothouse rooftop goosenecks. As for the wire lead itself, it got secured via cable tie and hanger to that wood panel in the upper right of the photo when I had tested the circuit.
The metal pipe is the duct for the heat pump that does cool and warm. That DC lead is not secured properly.


There's some sketchy decisions in view here: The anti-chafe hose for the AC is OK, but I don't actually know how hot that pipe gets and I wouldn't want to risk melting it. The DC run looks both prone to chafe and unsupported. The nylon hose acting as a support for the AC is just jammed into the hole in the bulkhead that contains the heating/cooling conduit. The good news is that the lower hose can take the "new" run from the forepeak and that the rust I can see here is minimal and easily reached with a paintbrush.
This is behind the starboard cabinet in the head. That wire just visible was also hung.
The access panel in the head, plus the slightly dubious if convenient hoses plonked in the holes made for the A/C pipe, made pushing the AC lead fairly straightforward, even if I was working by feel. One of the upside of our boat is that for all its eccentricities, and there are quite a few, access is generally easy and logical. Removing this panel revealed a few rust streaks, but again, nothing not easily fixed. It is about the most damp part of the interior, after all.
At last, the pilothouse: At least the A/C pipe is insulated here, quite close to the MarineAir unit.
I had about three feet to spare, some of which I was later able to pull forward into the forepeak. I shut down all AC shore power, snapped off the charger/inverter and got to work. I started at the "far end", because while cool today, the light was ideal. Recall the forepeak earlier today didn't have light save for what fell down the hatch.
I try to be careful not to nick the interior wires. I am not always successful.
I started by stripping the outside cover and the individual wires to the lengths specified for the 20 amp GFCI outlet. I spec'd this for 20 amp 120 VAC, because it's conceivable that I will do some light welding in the forepeak and the inverter can handle it.

I then labelled the run and put the plastic outlet box with its own strain relief over the run. After securing the wires to the outlet, I would back off the white-covered part outside of the box.
While this outlet isn't "marine", I doubt any of the outlets are, you know, stainless steel. In this box, however, it's protected and non-conductive, which is nice on a conductive boat.

I continued by putting heat shrink over the end of the white cover and clear heat shrink over the paper Dymo label. So far, this has had good results elsewhere aboard.
This is one of those times I'm glad I run a separate 12 ga. 50-foot extension cord to the boat's deck. I walked it forward and was able to run the heat gun without an issue. On Valiente, I had to run the Honda 2000.
I then attached the wires. Two holes are provided, but really, the way the screws turn, you should use the lower on the left-hand side and the upper on the right (hot) side, or so it seems to me, if you want it to curl around the bolt shaft and then get clamped down.
Why, yes, this is my filthy cycling in winter boat coat now 20 years old.
Connected up and shrunk down....

This is connected to the "line" side. Were I to have for some reason a second outlet off this one, I'd use the "load" connectors down by that yellow strip.
...and boxed up. Back to the pilothouse, heat gun and extension cord in hand.
In addition to finding an appropriate spot for this, I may box it in wood to make it look less crappy. I'm only a part-time barbarian.
I removed the appropriate panel. Previous owner work with nasty crimps, mine with heat-shrink crimp bodies and further heat shrink. The last "15A" breaker was available. If I want to go up to 20 amps, I have a breaker for that, but I don't really need to do that unless I really want to weld. I have no power tool aboard that draws more than 10 amps, so this will do.

This is when kneepads come in handy. Write your own jokes.
Same strip, crimp and shrink process, only here I use fork terminals.
That extra three feet of lead meant I could do this part standing, which was nice. I'm working on the helm seat.
Yes, I know "red" is a DC positive colour (or used to be) and "black" is DC negative, but who cares? It's what I had and that's the limit of my wiring OCD.
Crimped and shrunk and ready to be screwed down. Note that I need considerably more uncovered wire here to maneuver around the back of this fairly crowded panel.
Ignore the awful sole. It's getting replaced with teak and holly Lonseal or equivalent.
Done. Before screwing it back, I had to test the circuit. On with the shore power and on with the AC master switch. Then, the fatal flick...
And it was good.
Success! About two hours of wire securing, clean-up and restoration followed and this is still somewhat provisional.
Yeah, you try to find a label that says "forepeak"!
I have some slack I can use to bring the outlet over to the port side, but for the present I'll just tack it to the bulkhead until I can better secure it before launch. I hope to solve the DC issue by then, too, and then I can really start using the workshop as a workshop and just a place to throw fenders and stow line.
Now that I can see down here, I see it's a mess.

Bonus deal!

Shackle-lacka-boom-bah.

Thanks to BD Jones of the Dock Six media empire, I heard of a great deall on stainless steel shackles at Lee Valley, of all places, I'm happy to share to my Canadian readers. I went to the downtown Toronto outlet, as one does, and got two rings of "D" shackles and one of the horseshoe type....and the guy at the counter said "wait a minute". He brought out a second horseshoe type (top of photo) that had one shackle missing and...just gave them to me. So "free SS shackles" was worth the pedal to King St. West. At these prices, I can use them for lanyards on favourite tools, flag pennants and the biggest ones are fine for dinghy painters. SCORE! (Also couldn't resist the Soviet-era-looking padlock at the bottom...it's got such a weird key it might just work!). I later ran a magnet over them and they are definitely stainless steel. To quote Seinfeld, they're real...and they're spectacular.Thanks again for the tip, buddy!


2017-03-05

Handy dandy

The skipper has treated himself again.
Over the years, I've had impressively consistent results from Standard Horizon equipment. The original nav station VHFs on both Valiente and Alchemy were ancient, sticky-keyed and staticky relics and, although I replaced the radio on Valiente with a perfectly good, if non-DSC, ICOM M45 unit, (it's still working well and was sold with the boat), my subsequent desire to have a handheld VHF led me to purchase a Standard Horizon HX260S shortly thereafter. I hadn't heard of the brand when I started sailing back in the waning days of the 20th century, but I liked two aspects of 260S model that were relatively new at the time: it could be submerged thanks to a screw-down gasket and it could operate on either NiCad batteries or a supplemental AA "battery tray" one could keep in the "ditch bag". That tray corroded years ago, however, and the now over-15 year old 260S barely keeps a charge. But it still works, and, as most boaters on the Great Lakes will admit, they tend to use a handheld, five- or six-watt VHF in the cockpit to monitor Channel 16 to a far greater extent than they transmit on the more powerful (25 watt on the high setting) usually kept down below.
Simple but rugged and took a number of direct splashes with no ill effects.
So while there are cheaper VHF handies, and the brands Uniden and Cobra come to mind in this regard as decent "budget" options, I haven't found ones I like better in actual usage than Standard Horizon for thir combination of ruggedness, performance and feature-sets, which admittedly is a matter of taste given that almost all the major brands work well as VHF radios.
Apparently, this is still being sold. It's perhaps the funkiest of our VHF handies, given its size and random functions, like tinny classic rock reception.

I realized at some point that I wanted each member of the crew to have a VHF, and, at the time, that just meant Mrs. Alchemy, as the Cabin Boy was too young to muck about on air. Digital Selective Calling (DSC) was coming in, and although it would be some time before I got an MMSI assignment and started to explore this way of making a radio into a sort of phone as well as a greatly improved way to issue a distress call, I thought having a DSC handheld would eventually prove a plus. Standard Horizon obliged with a puny powerhouse, the multi-band HX 471S model. It seemed fearsomely advanced to us at the time, as it received AM and FM, Aircraft and WX bands, and transmitted on VHF, MURS and FRS (Family Radio Service). While I've never had a use for MURS, which seems dead in the water in Canada, I have used the short-range, low-powered FRS in conjunction with a pair of Cobra FRS units we got for anchoring practice. There's no radio etiquette demanded of this band that I know of, and unless you are a few docks over, it doesn't travel very far, unlike VHF, which I have managed to get six to eight NM of range with handheld to base unit. Anyway, the tiny 471S, while it didn't float, could take a splash well enough and was compact and light enough to be the handheld of choice for clipping to PFDs and taking into tenders. It's still working and will be gifted to Cabin Boy this season, who will need to take his Radio Operator's Certificate soon, as well as get his (mostly symbolic) PCOC.
Came with a strobe function, another nice add-on I hope never to use beyond "test mode".

Speaking of which, as he is now 15 and taller than his mother, the crew complement is now three, which argued a few years back for three VHF handhelds. Enter the SH HX 850, and back to floating handhelds, a real advantage if you've dropped the radio in the drink even once. Larger even than the old 260S model, if lighter, this featured a basic lat/lon GPS unit aboard, which I have used to report from the cockpit  to the Coast Guard various hazards to navigation, such as trees in the water or other debris. Even the 471S had a limited, charging cradle method of getting GPS info into its DSC distress calls, and I find this a useful and prudent adjunct to our handheld VHFs. This unit has seen the heaviest use aboard, as on Alchemy we are generally either on the aft "sailing" deck, or, when motoring or in pelting rain, we're in the pilothouse using our base unit VHF, of which I've given details before. Despite its girth, I have liked the big clear screen and (to me) simple menu options. I also like that Standard Horizon's "high power" setting is six, not five watts, which has never seemed to drain the battery faster, but has given slightly improved range to judge from anecdotal evidence and a bit of field testing.
And it's got the alkaline battery pack option.

With the "retirement" of our oldest handheld, however, we were down to two, although both were now DSC-capable. The Toronto Boat Show incented me to pick up Standard Horizon's latest whizbag model (ably reviewed here), the HX 870S, which was not only a great price, but which offered a $40 rebate. The screen is bigger and brighter, and the GPS is far faster to acquire a lock than the HX 850S, the strobe appears to be able to be seen from orbit, and so far, I think the sound quality is better. The GPS function is enhanced beyond lat/lon; you can use this unit as a compass and can easily note SOG and COG and distance to waypoint and can easily enter marks, such as harbour entrances..quite "handy", indeed. While this is admittedly little better than my still-functional Magellan 315 handheld GPS I got circa 2001, it's a great thing to have in a VHF, and the 66-channel GPS receiver is superior to the dedicated GPS. Even walking around my house, I can see I'm making one knot to windward. Another nice aspect is the waterproof USB port: you can download a program and input or extract data from the radio or use it as a GPS. Given we are going to be using PC-based navigation at least in part, this is another "belt-and-suspenders" navigation bonus. Interestingly, whereas the old 260S's optional alkaline battery pack took six AA batteries (adding greatly to its weight), this model takes just five AAAs...and still floats! The only downside is that on alkaline batteries, the transmit power is restricted to "low" (one watt). Otherwise, it's fully functional. Here's a better "unboxing review", courtesy of Waterfront Vacations, than I could have made:
So now all the crew have VHF-DSC handhelds. All are from Standard Horizon. I seem to have developed a preference.