Copyright (c) Marc Dacey/Dark Star Media 2006-2020. Above photo (c) Marc Dacey. Powered by Blogger.

2015-10-14

What cannot be borne

It's funny what gets on people's nerves. Expert sailor and good friend John C. was so bothered by the horrible sight of downed fenders on our September photos of Alchemy under sail that he Photoshopped them out in favour of dangling lines! I do admit we were perhaps preoccupied and they are all up on the port side...I swear!
Fenders rendered and surrendered.

2015-09-28

Plotting a hatch

Note the Swamp Thing hatchery in evidence.
Between work of the paying sort (both Mrs Alchemy and myself are hard pressed this month, which has already taken the edge off winter storage fees) and the algae attack in the basin of my boat club, it's been hard to consider pushing off for more sea retrials. But that doesn't mean the game's not afoot.

Measure twice, figure out the coefficient of thermal expansion, and cut once.
Behold Tony Johnson. He's a welder/fabricator, a marine engine mechanic, some variety of general contractor, and a professional diver. Truly, a hand for all seasons. He's taking on the task of turning my much-modified idea for an engine bay hatch and turning it into reality.

The Metal Supermarket-acquiried plate fits nicely, but needs building up in the form of HDPE frame-up to get it flush (minus the thickness of its eventual LONSEAL covering) with the rest of the pilothouse decking.
Behind Tony is the plate I bought myself to make the "fixed" part of the design below, which will only need to be unbolted should the engine or tanks require moving. Another advantage is that the fixed plate will make an excellent spot on which to mount some engine bay general lighting. Not all engine access issues happen in full daylight, after all. 
Evidently, I lowballed the measurements by about 1/8th of an inch, because I didn't realize the lid could be made as snug as Tony will build it...which is good.
While Tony will make up the metre-long aluminum hatch, I will drill the pin holes (I want clevis-type pins for this as they just need to stay in place) and to put in the struts (perhaps gas struts, but I already have friction-knob types and this hatch won't be super-heavy) and latches and insulation to finish the job, because that I can do. Given that I will need to isolate dissimilar metals with (likely) strips of EPDM rubber gasketing, which is one of the same materials I will use over the winter to insulate the mild steel inward flange of the pilothouse from its aluminum roof. So I'll need a fair amount, although it need not be thick.
A closer look: Tony told me to stick to Imperial measurements, which I found ironic coming from a guy in his 30s, but c'est la vie.

Getting rid of the existing framed plywood will cheer me up a great deal and a hatch that lifts forward, unlike my original "clam shell" design (see below) of vertically lifting half-doors, will actually be stronger and will allow better use of the floor when I need to deploy tools, and will have the added benefit of not having to make the lowest companionway step able to lift vertically.
Hatch plot the first: Elegant, but unnecessarily so.


2015-09-23

The bitter end

Our main, it has been suggested, has been cut down along the foot from something considerably bigger. Photo (c) Jeff Cooper
There is no picture of the visit yesterday of Ron Fernandes, the owner of Triton Sails, because I was hauling and flaking and going hmmm. Ron came by to measure and to discuss the New World Main (yes that may be a Rush pun), the details of which will be shared in the future. Amidst all my rattling on about chafe patches, triple stitching and the need to widen the mast gate in the slot a touch for the Tides Marine batten slide system I intend to get (the measuring kit arrived very promptly, which is nice), Ron suggested that the angle of the batten pockets and certain other giveaways argued that our main was once the top two thirds of a much larger main, like off a 55 footer or something in that class. The number is suspiciously low.

He's probably right, which is why he is the sailmaker and I am the customer, because this never occurred to me. But in the shot above, you can see what he's getting at. What I am getting at is that this sail, while in remarkably good shape given that it may be original to the boat, i.e. 1988, it's not 27 years old, it's a maximum of 20 years old, as it's been packed away in my garage for seven years. Furthermore, I don't think the previous owners sailed very much, as it shows little of the sort of thread damage or signs of chafe one comes to expect. So the above main is now the "Light Air/Spare Main"; it has three reefs and plenty of life in it yet, but it's somewhat lightly built for the ocean, in the view of myself and the sailmaker, who may be biased.
This is possibly too much roach. Illustration from Wikipedia

Looking more closely, one can see that there is zero roach to this sail, and as we are going to have battens to better control and shape the sail, we might as well get the benefit of some extra sailing area, and therefore, extra drive, out of a new mail. While some disagree that battens are necessary or desirable, not me. I like them and I want them. While the headboard of the current main is properly sized, it's pretty well the long side of the triangle down to the outhaul from there; even a conservatively cut roach will add precious oomph. My thoughts on where the reef points should go, I will save for now.
Yes, you are looking as a miscalculation.
The sharp-eyed will note that there are only two Kyocera solar panels here, and not four. This is because I failed to recall that I had backstays when I had the solar arch fabricated. Needless to say, I feel a right twat, but this can be fixed with a little welding of plate and some repositioning of the mounting fittings. Live and learn...the hard way.

These holes are as small as I could make them and are well off the anchor well decking.

A more successful needful task was to make up a place to attach the anchor rodes to the boat. Such a place is normally called the bitts, and was traditionally two heavy timbers lodged into the frames of the boat or ship. This bitts differ from bollards, which are deck-mounted structures that perform the same function as cleats, but which are generally more heavily built. The term bitter end is the end of the anchor rode, which can be rope, chain or both, which attaches to the vessel. 
Pacific Fasteners, you are so much more reasonably priced than chandleries.

Non-sailors assume that this is where the anchor rode pulls at the boat at the bitts; this is not in fact the case. The anchor rode can be attached to the bow of the boat at the waterline with a snubber, a plain piece of stretchy rope with a chain hook, or via a bridle, two ropes that run up to cleats and bollards. Other pieces of colourfully named equipment, such as a devil's claw or a chain brake, come into play as well.
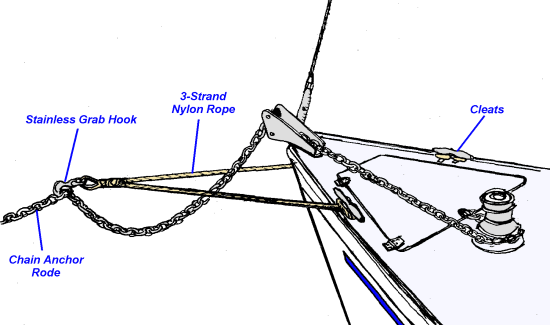
A fairly typical bridle and hook setup. Some sailors tie the nylon rope directly to the chain. Illustration (c) Bosun's Supplies
The point is that the chain, which in any kind of a sea can experience very impressive shock loads, is not in fact directly attached to the bow roller, the windlass or, indeed, the end of the rode, directly to the boat without some kind of intermediate shock absorber to tame the yanking motion of the boat going up and down in waves. The weight of all-chain rode does dampen this naturally, but the idea is to have stretchy or springy materials absorb and smooth out the sometimes abrupt loads.
Some dielectric paste and Lanacote to mitigate the dissimilar metals.

Now, the gold standard of making this up would be to not use aluminum plate as a load-spreader with a stainless steel U-bolt going through mild steel. I know this. But I also happened to have these pieces of aluminum, which I originally drilled years back as backing plates for deck-mounted cheek blocks on Valiente, handy, and I had Lanacote and dielectric paste, plus butyl and the fact that all surfaces are painted on my side. So I'll test this and see if it is sufficiently galvanically isolated to not corrode overmuch.
I love butyl and I cannot lie.
First off, I put butyl strips on the back of the "outside" plate. The SS threads and nuts were liberally coated with dielectric gel.
The whole forepeak will be emptied this winter, and will get a fresh coat of anti-rust paint, topped with bright white two-part for maximum light down there.
The same process was repeated for the back side of the anchor well, inside the forepeak.
Finger-tightened. No butyl is escaping at this point.
I added washers for very little reason, save that I had them nearby. There's enough leftover threaded U-bolt inside to conceivably make a bracket or a light mount there. Depends on my ambition, really.
Why, yes, I did have an 11/16ths inch deep socket. Doesn't everyone?
Dogging down the bolts consecutively, the butyl started to squeeze out around the edges of the backing plate. I've done this sort of job with butyl and bedding goo so often, I can usually estimate "enough" without needing to trim or to fetch rags.
Done...for now.
Here's the finished job on the outside, although I will trim that slight over-squish next time I'm there.
Strong enough to step on. I know, because I did it.

The two rodes, one a rope and the other a chain attached to a rope attached to the U-bolt, here performing the function of the bitts, are now securing the anchors safely. Whatever else I do, I can't easily let the anchor rode run off the boat now. 
Looks like it's supposed to be there. I can also attach chain hooks to this if I wish.
But what of the bitter end? See that red, white and blue piece of knotted rope? That's a cut from the spare Dyneema cored halyard I bought when I reroved the mast halyards. It's between the U-bolt and the bitter end of the chain rode that terminates at the other end at my Fortress anchor's stock. If the chain ran completely out in benign weather, sans bridle, snubber, chain brake or devil's claw, it's strong enough to take the pull. If, however, we get hit at anchor with such heavy winds that it is impossible to retrieve the anchor without injury or damage, and we have to put to sea...fast...think of that piece of rope as a fuse. It can be cut with a few strokes of a serrated knife, and a small, labelled buoy can be affixed to the bitter end with enough light line (enough to match the depth of the anchorage) to let the buoy float. Heavy weather passes, and you go back and haul in the chain and anchor. It helps to keep a non-rusting, serrated knife nearby, but you should have one in your pocket or on your PFD.

Now I think I'll relax with some bitters in my rum.
Paradoxically, I'm feeling less bitter already.


2015-09-15

Sail of the decade

Well done, main.

This the main of Alchemy. It is pulling 15 tonnes of steel pilothouse cutter through the water.

Note the ever-so-slight heel. We are off the dock, folks.
This is the still-warm water. It's Lake Ontario on September 15, 2015. It's what we call "a good start".

I have a much more impressive flagpole in the garage, which is what a lot of middle-aged skippers say.
This is Toronto. We haven't left it yet, but we appear to have the means, if somewhat primitive and in completed, to do so in the form of a functional sailboat, functional in the sense of "sails".
This beauty is Cristal, a Dufour 36 Classic, a very nice find for Mr. Cooper, seen at his own bow, showing immense trust in his autopilot.
The man at the bow above is Jeff Cooper, a good friend with a very nice boat who, upon hearing we were fixed upon casting off today with intent to sail (it was a sort of light air day that would give us the opportunity to correct screw-ups, should they arise), decided to come over and take some pictures. The best one, in my view, is at the end of this post, but this is pretty excellent, as well:

You can make out where the luff of the "temporary jib" is just about three inches too long. Photo (c) Jeff Cooper
I think she looks rather good. Like many boat owners who don't own a drone with a GoPro, I haven't seen my own boat from a nicely framed distance very often...even with the sin of descended fenders visible.

If I can get this furler about five cm. higher, I'll be able to use this completely inappropriate Kevlar No. 2 racing jib (from, if I recall, a C&C 34) as a spare light-air genoa. Or I can just cut down the foot a bit.
Today's "test sail" was to see if all our lines would run freely and to just try to remember how to sail a cutter rig with a furler way out front. Mostly, things went well, although I would consider furling the jib when tacking if the wind was 15 knots or more, as the space between the forestay and the staysail stay is rather tight.
What the numbers and "J" means, I have no idea.
The main, seen above, is in good shape, but it's light for ocean work (but fine for Lake Ontario) and is full battens with slugs...and is 27 years old. I want a new, heavier main for ocean work, so these photos are getting shown to the sailmaker tomorrow.
Flying well, given the somewhat undertensioned halyards.
The original Yankee-cut jib is damaged from an inopportune hoist last week, so the same sailmaker will evaluate it for repair or rethinking. The staysail is also a tad on the light side for ocean work; I am mulling over a heavier one with a line of reef points to make it good to 50 knots.
This is the square-rigged steel sail-training brig Playfair, off making use of her sail area.
So filters did not clog, nothing ripped or tipped, nothing broke and, despite the presence of possibly dozens of PFDs, nothing went into the water. A very minor 90 minute or so sail in steady, if featherweight, winds, but enough to get us sailing what has not been sailed in this decade.
WE'RE BACK, BABIES! (Photo (c) Jeff Cooper)

Please ignore the dangling fenders. The dock-departure checklist was significant and they were overlooked in the rush to get out and sail, probably because we dock portside at the end of a finger and these are basically "preserve the other boat" fenders...The sharp-eyed will also note the missing solar panels on the solar panel arch over the aft helm station, i.e. "the poop deck". These were removed in order to better position the backstays (there are two). I'll figure out how to get them placed shortly, as I'm going to move onto The Problem of Batteries soon.

2015-09-08

Jibbering

Why, yes, I would on occasion like a car, but I also like to look good in a kilt.
After the main, in the usual course (nautical pun intended) of sail events, comes the jib. I had some issues with the furler track, however, which I thought I had thoroughly cleaned out of several years of accumulated grubbiness of the mast rack and spider debris sort. Long, somewhat painful story short, the Yankee jib jammed near the top of the furler track and ripped at the junction of UV cover and headboard. Above see it and an unsuitable candidate for Replacement Jib trekking back home prepatory to repair at the loft.
This actually worked.
I knew that sending up a human or bringin the mast down to clean out 1/100th of a gram of spider web wouldn't work from a time management point of view, so I tried a different approach. Being Canadian, I resorted to duct tape and a large screwdriver. After drinking, I remember I had an even larger screwdriver. Lashed it was, and slotted and downhauled it rose. 
Lanacote, for your sticky groove thang.

My can of Sail-Kote and McLube wouldn't work here...I had no way to spray above seven feet off the deck. So I gooped up the screwdriver and went for Round 2 of higher elevation. Given that I was replacing the damaged Yankee with a slightly long in the luff, somewhat elderly Kevlar No. 2 I had never converted to hanks for Valiente, a greasy luff rope was not concerning.

Clearly, this works better when you have someone furling and someone else tensioning the sheets.
Well, she went up a little reluctantly, but without ripping, and the furling, while clumsy and in need of more fairleads (which are somewhere aboard...) worked well enough with no Allen bolts shearing or snapping of UV-damaged lines.
Eh, it'll work for today.
Cabin Boy helped stow the tender into one, shorter unit, and a day was called (a very hot September day, at that). I think I might go for a sail.
Looks almost functional, doesn't it?


2015-08-28

Mainly

To what "1024 J" refers, we have no idea. But check out those butch reef lines!
Yesterday, after some difficulty poking spider products from the mast track with a screwdriver duct-taped to a boat hook, we raised the mainsail on Alchemy. Good grief, I could hear the gasps of shock from the clubhouse. Spidery excavations aside, and Lanacote lightly applied, battens went it and up she went.

Partly because I have yet to locate the winch handles native to the boat (one would think they would be too large to lose, but this is apparently not the case), and partly because I have been promising one to my wife, the compactly built Mrs. Alchemy, for some time, we used a freshly purchased Harken "Carbo" winch handle, the type with the bar on top you can press to release the winch from the winch socket.

Ooh, born porn: CRANK HARDER.

It just seemed appropriate as it's been a rather extended period of time since Alchemy has had need of a winch handle. Now, of course, I'll have to service all the winches, but on the day they functioned well enough.

Not just for sailing, but for templating, if that's a word.
Now, while we were happy to see that years stowed in our allegedly dry garage did not seem to leave unsightly dirt on the main, the fact is that this main came with the boat and is of unknown age, although it's unlikely to be original to the boat's creation in 1988. And you can subtract "years in the sailbag" from its real age. Nonetheless, it is somewhat light for what I expect from the open ocean, and because Alchemy, as a custom-built boat, is not "in the book", I will have to have my sailmaker down to see the sail in action and to possibly leave with it to cut a second, heavier main (with deeper reefs, as I've gone off putting in a trysail track), reinforced corners and cringles and properly placed anti-chafe patches. The fact is that Alchemy has a very strong rig and can "carry" more sail somewhat longer than a lighter-rigged boat, and if I have a strong main with a third reef and a storm staysail (or the less-common reefed staysail). Given her motorsailer status, I'll want to keep moving under sail, even if it means keeping more sail up a little longer than would be prudent in a lighter boat.

More to come on sails in a couple of months. Given the rather close correspondence in mast height between Valiente and Alchemy (the latter's mast is one foot taller), we are bringing Valiente's cruising chute along for light air downwind work on the basis that I paid three grand for it and want to keep it! The Yankee-cut jib is another matter: we may want a second foresail of the genoa style for the furler. We'll see.

2015-08-21

Stepping up

Well, this has been some time coming. Alchemy's mast is in. Even the gods got in on the act.

Mast appeal.
Having finished the fuel system (save for a nagging problem I will report on in an addendum to the previous post), and therefore being mobile, I thought "hell, there's two months left until haulout, might as well try sailing the steel boat for the first time in..urm...some time".

I'm on a club team called "the Mooring Committee", and many of them kindly showed up to make short work of the turnbuckles and lines. Photo (c) Malcolm Kirk
It doesn't take a village to raise a mast, but about eight guys makes it pretty efficient. Photo (c) Malcolm Kirk


This required requesting my club's staff to move some trailered boats from in front of the mast racks, on which our poor neglected spar has been laying, Lazarus-like, for years awaiting the miracle of completed boat jobs.

Note to self: Don't shoot with Lanacote on fingers.
Sawhorses of the plastic variety were deployed (I have quite a collection) and members of the redoubtable NYC Mooring Committee were dragooned into shifting the very heavy (I estimate about 300 kilo) Selden spar onto the sea wall, aft of the pump out. That happened Monday. We (Mrs. Alchemy was available Monday and Tuesday) have been attending mast every day since.

Spreaders add another 20 kilos.
There was plenty to do: lubricating sheaves (there are sixon this mast, four up top and two for the staysail halyard and a spare for, say, a pole lift); checking cotter pins; cleaning at least some dirt; reeving new Dyneema-cored halyard (four reeved at about 100 feet each); straightening out line and stay and shroud runs; and a great deal of rewiring. Might as well do it right, or at least, less wrong.

A little loop of wire keeps the shroud in place until it's tensioned.


Another view: Normally, these "keeper" wires at the spreader ends would be taped or "booted", but I don't intend to do much heavy weather sailing over the next two months, just to reacquaint myself with her characteristics.

How the semi-senile skipper keeps 11 stays and shrouds straight.

The halyards I got at a bulk discount. Basically, I bought 80% of a reel of the stuff. I wanted Dyneema core for strength and its low-stretch characteristics, which I favour in halyards, and the Dacron cover for UV protection and "hand feel". It's the same size (1/2") as the stock Dacron line it replaces.
And it's pretty by virtue of being clean.
This doesn't mean the old line is compromised, but it's impressively grubby; I will machine-wash it all and make all sorts of lighter-duty runs out of it.

Why, yes, the tight angles of that Windex are pretty optimistic, but a skipper can dream.
I put in a new LED masthead light purchased last year (long-time readers will recognize this habit of buying stuff before I'm prepared to install it). I hit a wall in terms of fishing 65 feet of three-conductor wire, so I recut the old wires, crimped and heat-shrank on some adhesive tubing and I'll sort out the wiring at the bottom later. It'll be off in two months, anyway. 

Whip it good.
I also replaced the feeble old VHF antenna mount with a new Metz whip. Thanks to Active Surplus, I found reasonably priced PL-259 connectors, and got soldering. Plugging everything together today into the SH GX2200 base unit brought a gratifying "5 by 5" comment from the Coast Guard. I noticed immediately that I was acquiring more AIS targets, so I deem it functional.
Boom!
After some expert Polecatting, we got the stick in without incident, despite having to send up Sailor Jeff in a bosun's chair to undo the hook and sling. The solar panels, removed to address the error of "not remembering where the backstays go", will probably stay off until I can have their arch redone to take the outer panels offset. The engine performed flawlessly, as did the steering in tight conditions and blustery wind. Rigging the boom, the mainsheet and the topping lift didn't take as long as tidying up the pilothouse, which tends to sprout toolish disorder after one of these sort of jobs.
What tangles that remain I'll solve tomorrow.
Now, to prise the sails out of their hidey holes in the garage...