Copyright (c) Marc Dacey/Dark Star Media 2006-2026. Above photo (c) Marc Dacey. Powered by Blogger.

2019-05-27

A flood of infinite labour vs. finite time


The above shots show the progression of the rising waters at our club between May 6 and May 14 this year. It's a rerun of the destructive flooding of 2017, and while our club, by virtue of having floating and not fixed docks, and the building itself built on a low podium of sorts, is in less trouble than many other lakeside operations, things remain tense.
The bridge over excess waters.
While our previous experience has given us as a club some expertise, even a mild breeze from the wrong direction can send waves against the lawns and brickwork, much of which is now sporting algae and waterfowl and even small fish.
Why, yes, this has made getting masts in problematic.
Trouble is, there's no evidence that this will stop soon. At its exit to the St. Lawrence River, Lake Ontario's outflow is controlled by a series of dams, but there's a hard limit to how much water can be sent downstream to Montreal, which has had arguably worse flooding this year. So the rest of the Great Lakes in a very wet winter and spring continue to gush, via Niagara Falls, in our general direction.

Trenton shed number 2: Oh, this was annoying.
Meanwhile, work proceeds on the time-honoured labour principle of "you can sleep when you die". The newer of the two sheds in Trenton was, at some cost to temper and knees, completed by my father-in-law and myself despite some clear issues at the plastic shed plant. Never again. Wood and planks for me, or steel. Yeah, steel's the ticket.
I don't even know what will go into this yet. But something will
The new tenants are working out fine, despite their discovery of some house-flipper mischief that dogged their enjoyment regarding certain plumbing and electrical half-assery. So bills have been paid.
Main post lazyjackings.
 The mainsail is on, and the lazyjacks (including a bosun's chair rereeving by Mrs. Alchemy) are lazyjacking. From a distance, Alchemy's starting to look functional.
Those empty slips are now occupied.
 Beneath decks, improvements continue. The new hydraulic lines are installed (autopilot to come) and "anti-chafe" applied.
There's not the rub.
In the same vicinity, I chopped the floor in half and added handles to make the "aft bilge" accessible. It's not a huge space, but it's dry and awkward objects, such as the storm shutters, can nestle there comfortably.
That's the propshaft log down there.
The anchor's on again. Yes, I need to "borrow" the swim deck of the powerboat ahead of us to safely do this job.
The rustier chain is to the Fortress "lunch hook"; the main anchor chain is partially in the lashed black bucket.
Add caption
The arrival of the monster Loos Gauge permitted a provisional tuning of the rig.

We hired three labourers at short notice to help us hump this thing into place. Never have I paid cash so happily.
One of my tenants is a contractor and very kindly drove our ridiculously heavy boat cradle off the club property and to the somewhat damp Trenton backyard "depot".
Padeye through-bolted for preventering.
Meanwhile, back aboard, some long-standing safety matters were in play. We've never had reefing or preventers rigged on Alchemy, but that's changing. The reefing's pretty straightforward: we're going with two-line "slab" reefing for simplicity and because it's easy to work at the mast for us. Another advantage is that dacron-covered Spectra/Dyneema line means less weight aloft with no loss of strength. String theory in action.

The padeye above is the terminus of the Spectra-core line that goes on starboard side about the length of the boom and which is secured on a horn cleat near the gooseneck by a loop of shock cord. Running from the cockpit to beefy blocks either side of the bow and then outside of the forward shrouds are two 1/2" Dacron lines, which are stretchier than the Spectra-core. Tying or shackling the boom line to the bow line and cleating off means that downwind work is made safer (and easier on the rig) by "preventing" crash gybes. We are still considering a boom brake, but our mainsheet tackle, at 6:1, is already good at controlled trimming, so we'll review later on.
I call it "Frasier".
The stern was adorned with the remounting (after the SS base finally turned up) of the deck crane, which is used to bring aboard dinghy motors and provisions of unusual size, delivered by tender.
Stairway to heaven.
I "fabricated" (using a length of wood, a shop vise and main force) a third tabernacle step for Mrs. Alchemy to be able to reach the top of the mainsail cover, the mainsail halyard shackle and other areas a little too out of reach for a 160 cm. skipper. Don't let the size fool you: that little tab can take my weight. The angle is on purpose...it just needed a quick filing of the edges.
Lexan, stainless steel: two things tricksy to drill.
A salvaged sheet of 3/8" Lexan shall serve as storm shutter material for the aft cabin portlights and the pilothouse windows forward. We really don't need them elsewhere.
Shifty, if you ask me.
A long-time ambition to have an outside throttle-shifter is about to be realized this week as the existing Morse cables to the engine will be paired with two more similar to special Teleflex fittings which allow either the aft deck throttle-shifter or the pilothouse shifter, assuming both are left in neutral, to operate the diesel. This avoids having to purchase "yokes" for 2 into 1-style cabling, which saves money for us and reduces complexity inside the boat.
I like to keep the engine clean, it's a clean machine.
Measuring up the preventer geometry, I found the existing mainsheet was too short to allow the boom to get fully "over" in order to be preventered. So I sewed a second line onto the first to see how much more I'd need. Turns out 25 more feet was the answer. Remember, at 6:1, that gives me only four more feet or so extra swing. I took the opportunity to reduce the mainsheet diameter from 1/2 inch, which was binding a bit when wet, to 7/16": the loss in ultimate breaking strength was tiny in such an otherwise robust setup, and while my hands prefer 1/2" (which are the diameters of the halyards and sheets), this is easier to coil down in such a long length.
Full and by.
We had the Dacron cover of our spare halyard fray off for a number of feet: turns out that some of the necessary clearances of our busy halyard configuration allowed some chafing to occur. I (again) sewed a new line onto the old and rove it fairly easily over the sheave. The former halyard will become spare docklines of unusual strength once the cover is lashed back into place and whipped.
This is less confusing than it looks.
Lastly, our old Easyblock double block, used for the portside combo leading aft of the port jib sheet and the furling line, was taken off active duty in favour of the HARKEN DOUBLE BLOCK, in all caps because of its expense and terrifyingly competent appearance.
Block apps.
 Meanwhile, it's getting Biblical out there.
Yesterday (May26, 2019) on the access road to the club.
The storm drains are reversing and lake water is creeping onto the road. We've heard rumours, which Mrs. Alchemy wisely discounts, but still...that the massive current in the St. Lawrence seaway system may complicate locking down this summer, as is our intention. So we will keep out the customary weather eye. I'm glad I pushed the masting as fast as I could at the beginning of May. Seemed prescient.

2019-05-13

Lurch, launch and all before lunch

Amid frankly appalling (see wind-driven sleet in the tiny clip above) conditions and a case of skipper's jitters regarding the soundness of the standpipe thread sealing...

When access was straightforward, no problem...

...but with this much lead in front of it, a concern.
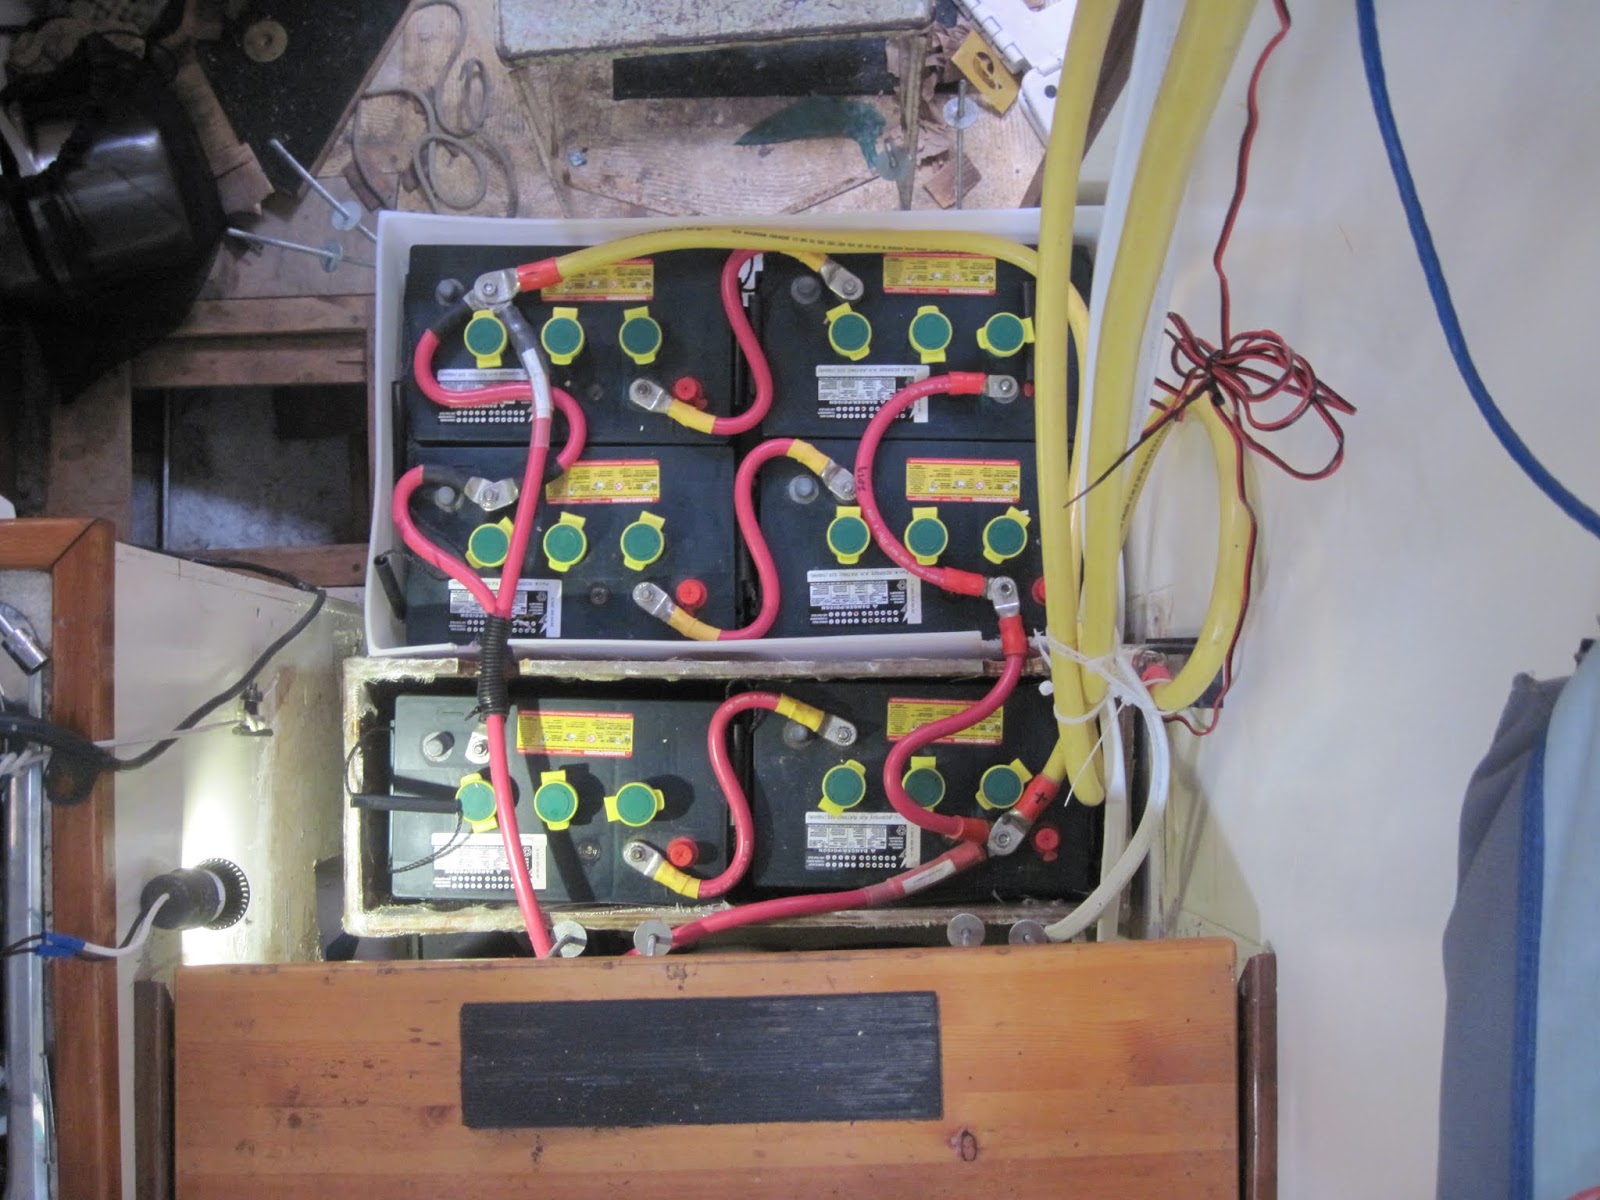
...thanks to the restoration of the house battery bank, seen above minus tie-downs and lids, we launched on April 27. Second boat in, in fact, in the East Yard, winter lodgings of the behemoths of the first row.
Always be cinch-belting!

There's often a touch of ambiguity about our sling marks, as the movement of internal ballast over the winter can be significant.
So we requested, and grudgingly (because launch waits for no one) received "a minute hanging in the slings" to check the integrity of our multiple valvings, tapings and pastings. Luck and, I certainly hope by this stage, skill prevailed and we had no ingress at the many threads in play. That meant I could leave the engine cooling water valve open, fire up the iron jenny (already tested in the cradle as being good to go, the harness and battery connections fully restored) and proceed to our dockline-festooned slip.
Back where she belongs...until July.
As I was on towboat duty, and, inexcusably in my view, a lot of boats this year needed tows (the ones with dead engines/no engine get a pass, of course), I couldn't linger and admire our handiwork, or tapework: Mrs. Alchemy and myself resumed "helping out at Launch".
Shot from mid-morning, this gives an idea of the scale of the cranes employed at launch. Ours is not, in fact, the heaviest boat in the club, an alarming stat for a steel boat owner.
The wind, at times gusting past 25 knots (borderline for crane operations and enough to make Alchemy "shiver" in the slings a few centimetres off her cradle), gave us in the club workboat Storm King plenty to consider. I lost count past 20 tows, but it was near-continuous and increasingly cranky duty. Why can't people ensure their motors work (and have batteries and tillers) on the day? It's not a surprise if you can work a calendar!
Alas, my logo was rejected in favour of cheaper Mac-Tac
After my shift concluded, I got a picture of the effect of Alchemy's winter on the substrate...

No wonder I felt pitched a little for'ard.
This subsidence was, perhaps, aided and abetted by the rising levels of the lake, which led to a group decision to get the mast in as soon as possible.
Two weeks ago. Today, the bricks are partially awash. The lake is 1.6 metres above chart datum.
I had to sort all the wires, cables, strings, stays, shrouds, halyards, etc. and bolt on the spreaders. I'm getting about as fast at this as I think I can. Kudos to the club members who helped with my notoriously massive mast.
It's only confusing if you think about it.
Some chafe-type repairs were needed and the usual "keeper wire" sorting, but it went well and the masting, while heavy work, went without blood sacrifice.

Looks good even boomless, we think.
So, for a multitude of reasons, launch came and went to our satisfaction, even though we needed every minute in the run-up to it and many minutes since.
Postcard-grade, really.
The boom is on, and the new lazyjacks can be seen. More to come shortly as the Drive to be Live in July continues.
I rigged the lazyjacks by copying a picture I saw online. Ah, modern sailing theory!
As a postscript, our former boat Valiente is now sporting a new, stainless steel rudder. We are vicariously anticipating great things of it for the new owner!

Anode goes where? As she's on a mooring, not such a big deal...


Getting properly hosed

Helm's deep: Mind the hobbits.
I alluded to the rehab of the hydraulic hose setup in a previous post. This was accomplished by biking a fairly ambitious distance from downtown Toronto to the north of the suburb of Brampton, home of Green Line Hose and Fittings, a well-regarded hydraulic specialist. Because I was not entirely sure if my fittings were metric or Imperial, I removed all the old, starting to weep hoses and handed them over the counter, saying to the compentent fellow there "please replicate these". And they did.

While I have two seal kits for the two helm pumps, they looked in pretty good condition, and so become spares for the future. While onerous to replace and reroute these hoses, it was a good learning experience. We have the autopilot pump in hand, but ran out of time to fabricate and weld in a stainless steel mounting plate for it, which I hope will be done this week, after which I can piece together the new and wonderful autopilot. However, we were able to launch with restored steering that is properly pressurized and is clearly needed fewer helm wheel turns to go chock to chock, so to speak. In fact, I may have to take a more subtle approach as it's that much more responsive.
Shiny is good.
Restoring the hydraulic oil was interesting. Firstly, my hose runs are long: nearly 25 feet each from the pilothouse aft to the rotary actuator pump in the stern, plus a pair of 15 footers from the aft helm on the "sailing deck". Even with the tiny cross-sections of the hydraulic hoses, that took about three litres of oil, all of which had to be bled to purge the air (using cryptic translations from the Japanese I would have run through a native speaker's brain before printing, personally). Still, can't argue with success.
Dryfitting prior to bottom painting.
The aluminum anodes are on, all 16-odd kilos of them. I had a bit of trouble with Nautilus Propeller's fulfillment from the VariProp factory in Germany; having been promised the aluminum prop hub anode I ordered at the boat show months back, they sent zinc instead. No good to me at their price, as I could get zinc at a fraction of that from the U.S.-based Boat Zincs. com. So I have a zinc prop anode on the prop and aluminum plates on the hull and fingers crossed, this will suffice (the two metals are cathodically close) for the trip down the river until haulout in October in Nova Scotia. Had I left the magnesium anode on the prop, it would've potentially bubbled and fizzed after Quebec City and the introduction of salt water...not a good look!
Better than nothing!
We switched to Pettit Horizons bottom paint, which went on thicker and more expensively. Looks good, however, and, as in the past, we changed the colour so that paint failures will reveal the previous iteration, should that be a data point worthy of note
Ready, aye, ready.
Anode what you did last winter.
The next step was launching for 2019 into an already swollen lake.

2019-05-12

Stand by your pipe

A magnet, some line and a boathook hauled this out of the lake after six months. Cleaned up nicely, no?
As the departure date approaches, and, as the last post suggested, the paying work has more or less ceased, boat work has taken on a near-daily rhythm. I say "near" because there are still calls on my time for peripheral concerns, like our out-of-town rental property.
My brother-in-law tacking down the flashing on the roof vent on the last day of March. It's been a fairly harsh spring.
The day before our new tenants were to move in, the next-door neighbours contacted us and said "I think the flashing coming off your roof and is maybe letting snow and rain in."

Talk about motivation.

Myself and my brother-in-law skedaddled eastward, drill sets and fasteners in hand. As it turns out, the flashing was actually aluminum soffit lengths under a wooden, full-length "cap" over a roof vent. Water couldn't actually get in, but we repaired it nonetheless as I wanted to make things right for the new tenants, who are now settling in.
They look heavy, and weigh more.
Meanwhile, back on the still-cradled boat (circa the start of April), I had to remove the six L-16 batteries in order to access the standpipe, which brings water from the outside of the hull to, respectively, the raw-water cooling side of the engine, the head, the air-conditioning/heat pump circuit, and, in the near-future, the watermaker we hope to install in Halifax.
Note the relatively short threads on the nipples.
I discussed after haulout last fall with Andrew Barlow, pal and fabricator/welder extraordinaire, the possibility of replicating the original standpipe of Alchemy in favour of something a) in stainless steel and b) threaded in NPS to take Marelon or equivalent ball valves, as we did with the galley and head sink drains.
Creative carving was required in order to access the various sides of the standpipe. This is inside the galley cabinetry.
Andrew indicated he was up for the job, despite the tricksy time he had in the past getting the NPS threaded nipples cut on a lathe. Despite the fact that NPS, which needs pipe dope or Teflon tape (or both) to be sealed as it is not sealed via a tapering thread, is quite common, apparently you need to know some kind of handshake to have a set of NPS dies.
Four really expensive valves, one pipe. Behold the logic of "fewer holes in boat, happier skipper".
The two leading manufacturers of plastic-type (as opposed to metal) ball valves are U.S.-based Forespar and New Zealand-made TruDesign, the latter being the newer entry in this rather rarefied field of yacht plumbing. The rationale is that plastic valves neither corrode nor are subject to galvanic corrosion, evidence of which I found in the replaced drain nipples and in the old standpipe. Both had bronze ball valves on mild steel nipples.
The dry fitting is a good way to see if you're going to have problems. The Tru-Designs went on precisely.
I opted for TruDesign because last year's Marelon ball valves leaked slightly and spun on with some reluctance. We were able to get them to work, but the 3/4" I.D. ball valves I obtained from Defender Marine seemed to bind in the NPS threads. A phone call to Forespar confirmed that they used "only NPS", which was the whole reason I had to go that route in the first place. Nonetheless, I did not feel confident about such a mission-critical component (all the water-inlet nipples are well below the waterline, of course) making me anxious, so I got four TruDesign ball valves.
Occasionally, I plot my next moves on the foredeck when hauled out. Visionary requires visions.
 I now have spares. That's OK. With water tankage and a water maker to come, I'll use them.
Sparky!
Having cleared the space, cut the needed access, and assured sufficient power, I watched as Andrew wielded his grinder in the tight quarter. Apparently, yoga keeps him flexible.
Further inspection of the old standpipe suggested replacement to avoid failure was a "sooner rather than later" situation.
The hole left down in the hull was interesting because it's the smallest possible amount of wood I could remove to allow Andrew room sufficient to weld the new standpipe in place. Those black hoses are fuel lines from the forward and aft keel tanks. This whole area is usually beneath the batteries and (of late) companionway stairs.
The abyss.
 The sight of Andrew welding a structural "doubler" on the outside of the hull was...interesting.
Not seen: A fire extinguisher at the ready
Of note is the positive shut-off. When working on the batteries, I typically turn off the charger at the panel, the main switch and both the positive and negative disconnects.
That area, once completed, was painted by Mrs. Alchemy
 The welding went well, I thought. By "well", I mean "we didn't sink when launched".
It's warm work down there.
I had to cut a little notch for the lowest nipple (the engine raw-water inlet). No biggie: I have a useful Fein Multimaster knock-off I've brutalized for years. Still works and cost me $99! 
Note the depth of the threads. I wanted maximum contact.
The picture shows the nipple covered in Teflon tape. I also used pipe dope, aka "joint compound" or "pipe paste". I use it sparingly and it coats the threads both on the valve and the nipple. Absent the sort of gasket a garden hose possesses (probably the most common object the average person would encounter an NPS thread), the combo seems to do the trick.
I had to orient the handles in different directions and mountings to allow them to work in this proximity.
Spoiler alert: Not a drop. 
Smooth operation. When we haul in Halifax, I'll have it ground down smoother.
This was a big and backbreaking project, but I'm happy we did it. No amount of softwood bungs would do the trick if a pipe nipple crumbled at sea.